During out-of-home operation, communication with the unit takes place via an internet server. It may take a few seconds or even minutes for the action to be received by the adapter.
The same is also valid in the opposite way: when the state of the unit has changed (by e.g. using the infrared remote controller), it can take a couple of minutes before the action is reflected to the Daikin Online
Controller smartphone application.
When you are in reach of your home network, it is recommended to log out of your out-of-home account to achieve a more immediate reaction of your unit.
The timer actions are executed according to the WLAN adapter clock. You can check the current WLAN adapter date and time in the Daikin Mobile Controller application by tapping the applicable unit and then go to "Adapter
settings" then "Time".
Make sure that the Time Zone has been set correctly.
You can save up to 42 actions (maximum 6 per day) to the timer. When 6 actions for a specific day are programmed already, you will not be able to add more actions. Delete at least 1 action to be able to add a new action.
To do so, you can follow below steps:
To add more units to the same account , repeat step 1-6 for all remaining units.
For BRP072C42, please make sure that the unit and WLAN connecting adapter are powered on.
For BRP072A42, when in [AP] mode, go back to [RUN] mode and return to [AP] mode by pressing the [MODE] button, this to switch to another Wi-Fi channel. Repeat if necessary.
You can reinitialise the adapter with following instructions:
On the WLAN adapter:
Make sure your wireless network name does not include special characters such as “%” “&” “?“ “+” “=” or non-ASCII characters. They are not supported by the WLAN adapter.
Make sure to use a compatible security setting. The WLAN adapter supports only WPA or WPA2 personal with AES encryption only.
Make sure that the wireless network band is B/G 2.4Ghz
For BRP072A42,in case all settings are correct and the adapter is not connecting to the network (RUN LED keeps blinking), try to switch to “AP” mode and back to “RUN” mode by holding the “MODE” button on the WLAN adapter.
For BRP072C42,in case all settings are correct and the adapter is not connecting to the network (RUN LED keeps blinking), try performing a factory reset by pressing and holding both "SETUP" and "MODE" buttons simultaneously until all LEDs start blinking. Then release both buttons and briefly press the "SETUP" button again. The LEDs will blink rapidly. Wait until the "POWER" LED remains steadily lit — this indicates the adapter has been successfully reset.
The Daikin Mobile Controller application currently supports only English and Traditional Chinese. The application language is automatically set based on your device’s operating system. If your device language is not supported, the application will default to English.
Another user is controlling the indoor unit via e.g. the infrared remote controller, via another smartphone or voice controller service. Wait 15 seconds and try again.
To be able to trace back the WLAN adapter that is connected to a certain entry on the unit overview on the smartphone application, you can use the connection test function.
To use the connection test function, make sure that your smartphone is connected to the same network as your WLAN adapter(s) and make sure you are not logged in to your out-of-home account.
Tap on the unit you want to trace back in the unit overview screen, then go to “More” and “Connection test”. The LEDs on the matching WLAN adapter will start blinking for about 3 minutes.
>>Please disable cellular data while connecting in AP mode.
>>Please make sure that your smartphone is installed the latest application
>>Please make sure that your smartphone is connected to the Wi-Fi SSID [DaikinAP*****].
>>In case your smartphone automatic switch to another SSID, please setting your smartphone to disable the automatic Wi-Fi switching.
In case the "Wireless connection configuration", it is available only when the smartphone is connected in AP mode. Make sure that the smartphone is connected directly to the WLAN adapter.
For another settings, are available when the smartphone and WLAN adapter are connected in the same wireless network and make sure you are in "In-Home" mode.
When the WLAN adapter is connected to a wireless network with internet connectivity, the WLAN adapter will synchronize its date and time with a time server (GMT). The WLAN adapter offsets this time with its time zone
setting and (if applicable) the daylight saving time.
When the WLAN adapter is not connected to a wireless network with internet connectivity, the WLAN adapter synchronizes its time and date with the connected smartphone.
Make sure to fill in all required fields in a correct way: “x.x.x.x” with x value 0-255.
Only passwords with characters a-z, A-Z and 0-9 can be used. The password length must be between 8 and 16 characters.
Open Daikin Mobile Controller app then tap on  (at the top-left of the App) select
 , then follow the manual in app to make the connection to router.
In case you are connect the WLAN adapter directy (AP mode)
- If you are using an Android smartphone
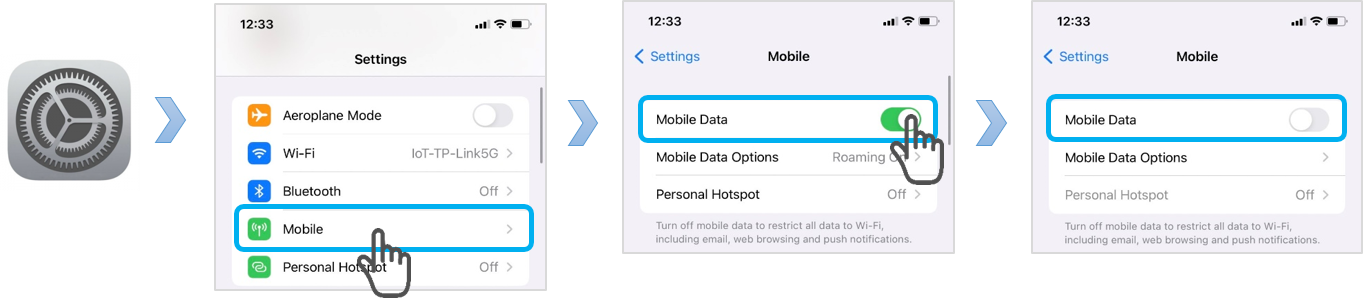
* Before connecting the DaikinAP*****. Please set the mobile data to be OFF.
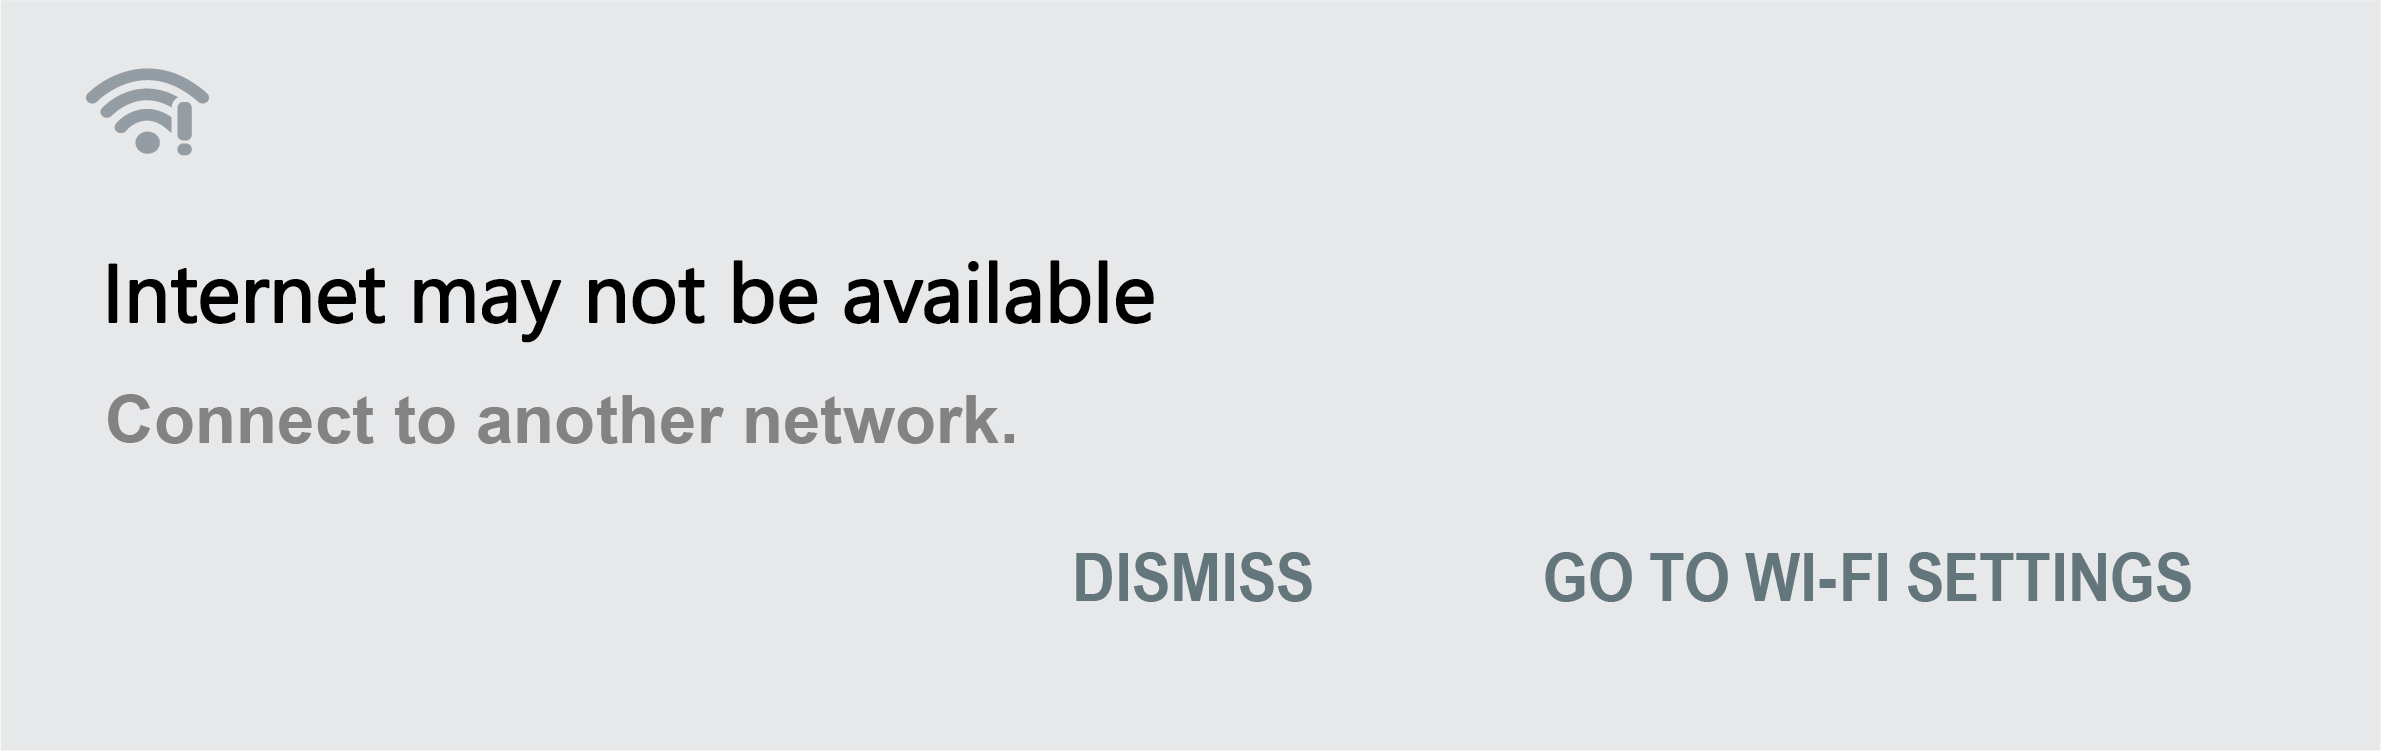
* After finish connecting with Smartphone. If there is the pop up like below picture, select "Dismiss".
- If you are using iOS 15 or later
* Please turn off Mobile Data on Settings.
* Problem (iOS): Unable to call HTTP in the local network — all units in the local network show an error.
* Solution: Restart the device.
In case you are connect the WLAN adapter through router (In-home mode)
Also check that your router supports UDP broadcast function and it's enabled.
Note: For iOS, in the first tme of using an application, please allow the iOS device to find and connect to other devices in the local network.
In case you are using as Out-of-home operation
There is an error occur with the air conditioner unit.Please confirm the air conditioner manual.
Error details may include:
In case you're using iOS 18 or later:
Please try reopening the app or the unit. If the problem still persists, please restart your smartphone.
Please check that your wireless router is close enough to your WLAN adapter. The range of the WLAN adapter can be reduced significantly by obstructions containing metal (e.g. reinforced walls).
Also check that the router is not set to use Wi-Fi channels 12 or 13 on your router’s setup page (ref. your router’s manual). The WLAN adapter does not support the use of Wi-Fi channels 12 and 13. If the router is set to
Wi-Fi channel 12 or 13, change the router settings so another Wi-Fi channel is used within the range 1-11.
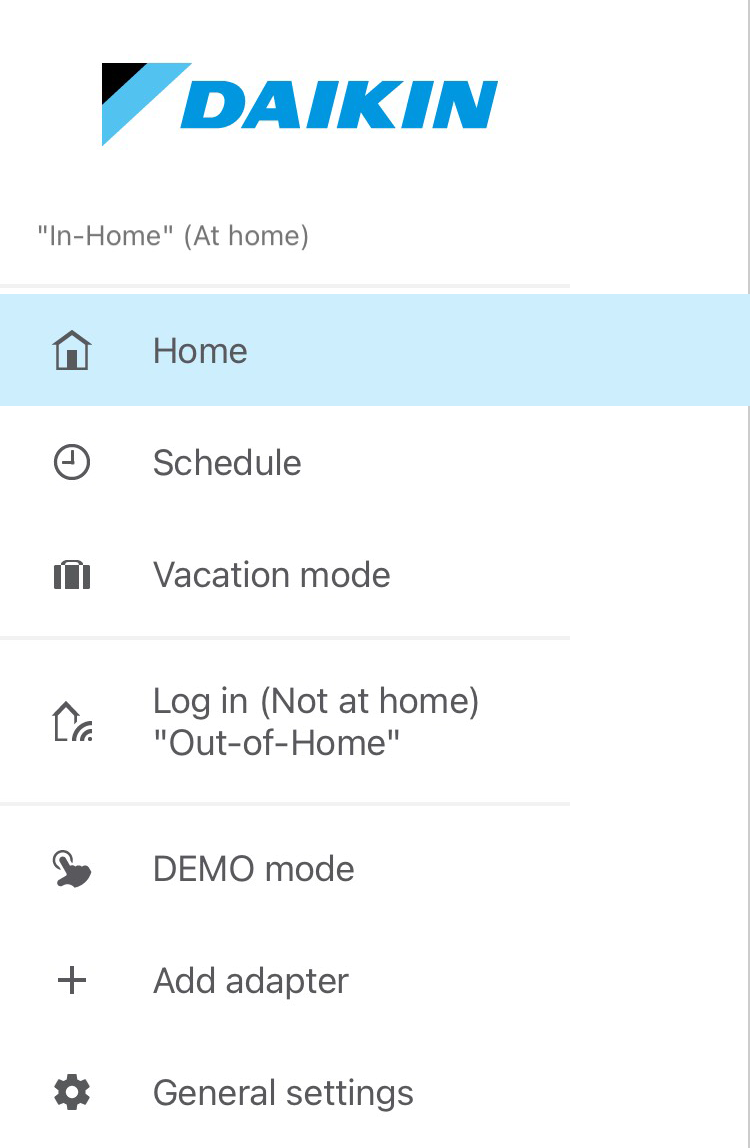
You can see the In-Home/Out-of-Home status on the top bar of the application.
Make sure you are logged in and then go to app menu on the left side,
you can switch mode using "Switch to In-Home" or "Switch to Out-of-home" menu.
Make sure you are logged in before do the next step.
You can change the password from the following steps:
1. From the app menu bar on the left side.
2. Tap "General settings -> Change password".
3. Follow the instruction on the screen.
Since the application not support the forget password function.
You can only create a new account and password from the "Login" page.
Make sure you are logged in to the application.
You can delete the current account from the following steps:
[WARNING!] After the account is deleted, all of units will be unlinked from your account, if you to operate the units from outside, please create new account and re-enable Out-of-home for each units.
1. From the app menu bar on the left side.
2. Tap "General settings" -> "Delete account".
3. Follow the instruction on the screen.
Normally the Out-of-home status of the unit will be change to OFF within 2 minutes after account deletion finished. However, you can turn it OFF by yourself.
- If your application is the latest version, you have to turn ON the Out-of-Home on the unit by yourself.
Note: This process have to be done in the local network (smartphone and the unit must be in the same wireless network)
- If your application is not the latest version, please update it.
If your account is linked to voice controller service (ex. Google home or Alexa), the re-authenthication process is needed after the device firmware update is completed.
REMARK: Perform this instruction only one time per account.
For Alexa user, please follow this instructions:
[ALEXA]
**********************************************************
Open Alexa app and try DISABLE the "DAIKIN Mobile Controller" skill using Alexa app and then ENABLE it again or you can follow below instructions:
How to DISABLE the skill.
1. Open Alexa app and go to "More" menu.
2. Tap on "Skills & Games".
3. Search for "DAIKIN Mobile Controller" and tap on it.
4. Select "DISABLE SKILL" and confirm the disablling.
How to ENABLE the skill.
1. Open Alexa app and go to "More" menu.
2. Tap on "Skills & Games".
3. Search for "DAIKIN Mobile Controller" and tap on it.
4. Select "ENABLE TO USE" and follow the instruction on the screen until finish.
**********************************************************
For Google Home user, please follow this instructions:
[Google Home]
Open Google Home app and try Reconnect account of the "DAIKIN Mobile Controller" service or you can follow below instructions:
How to reconnect account.
1. Open Google Home app and go to "Settings".
2. Seek for "Services" topic then tap on "Works with Google".
3. Below the "Linked services", tap on "DAIKIN Mobile Controller" and select "Reconnect account".
4. Select "Continue" and follow the instruction on the screen.
To do so, you can follow below steps:
To add more units to the same account , repeat step 1-6 for all remaining units.
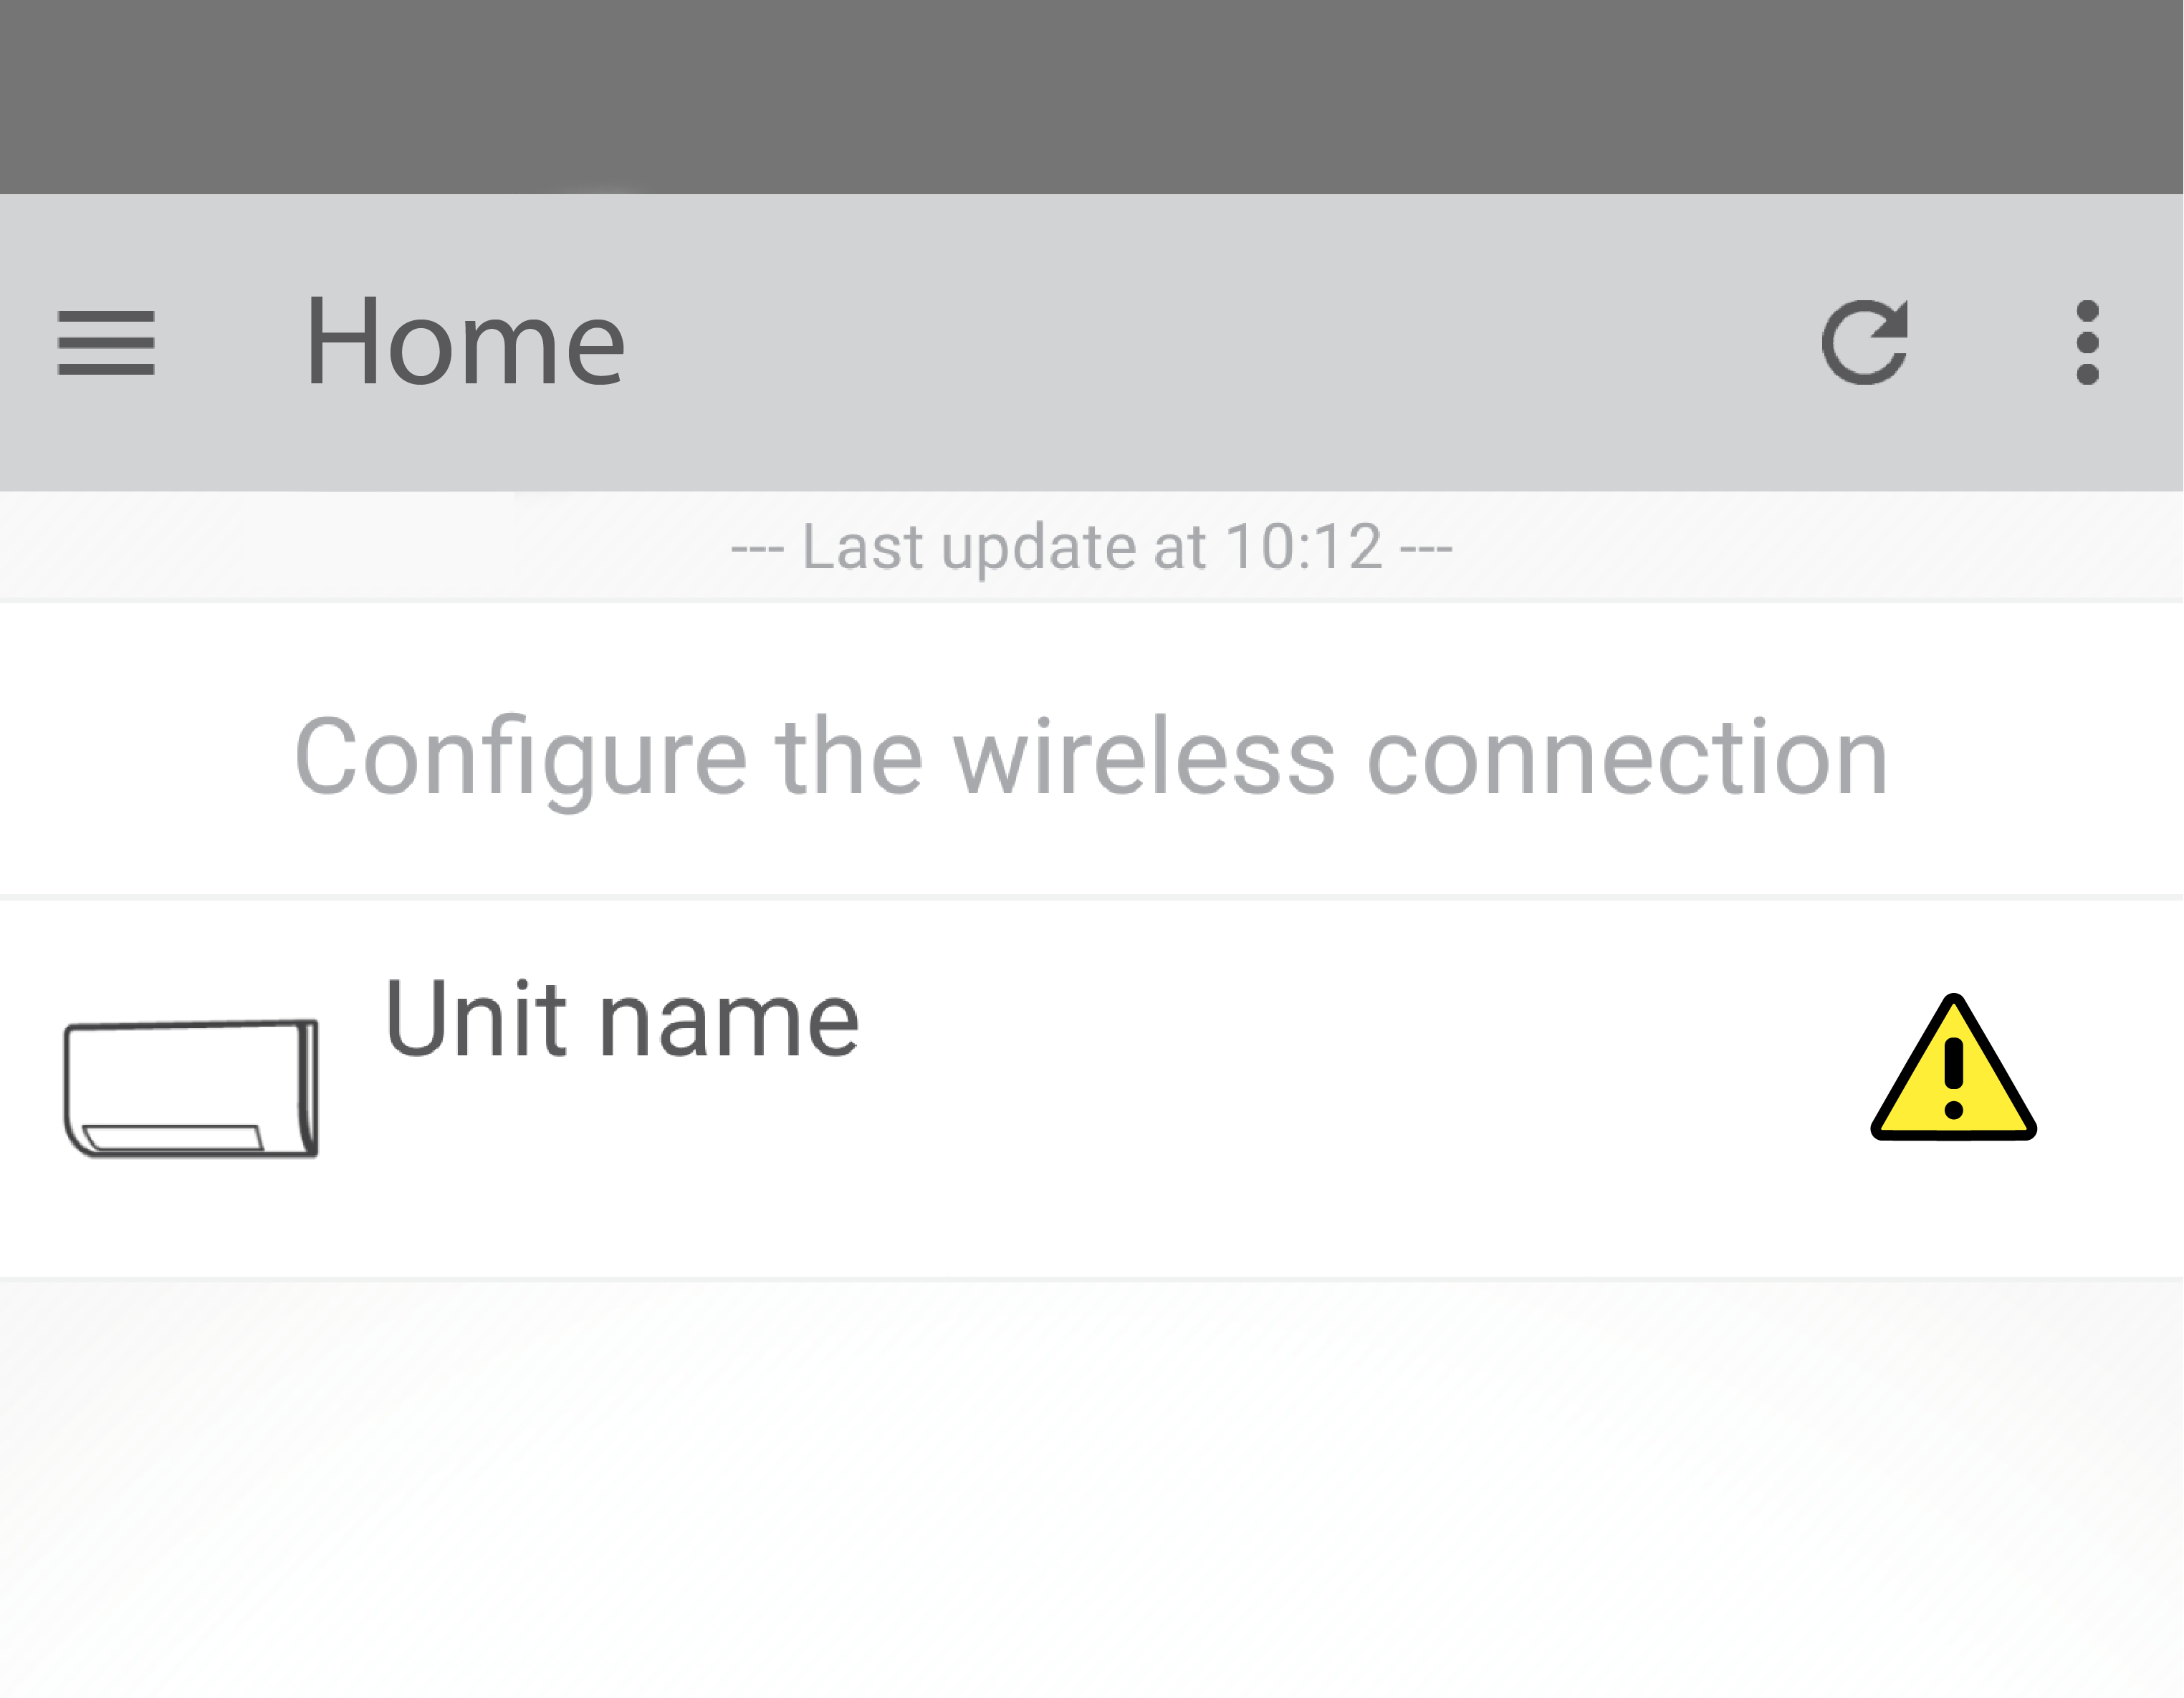
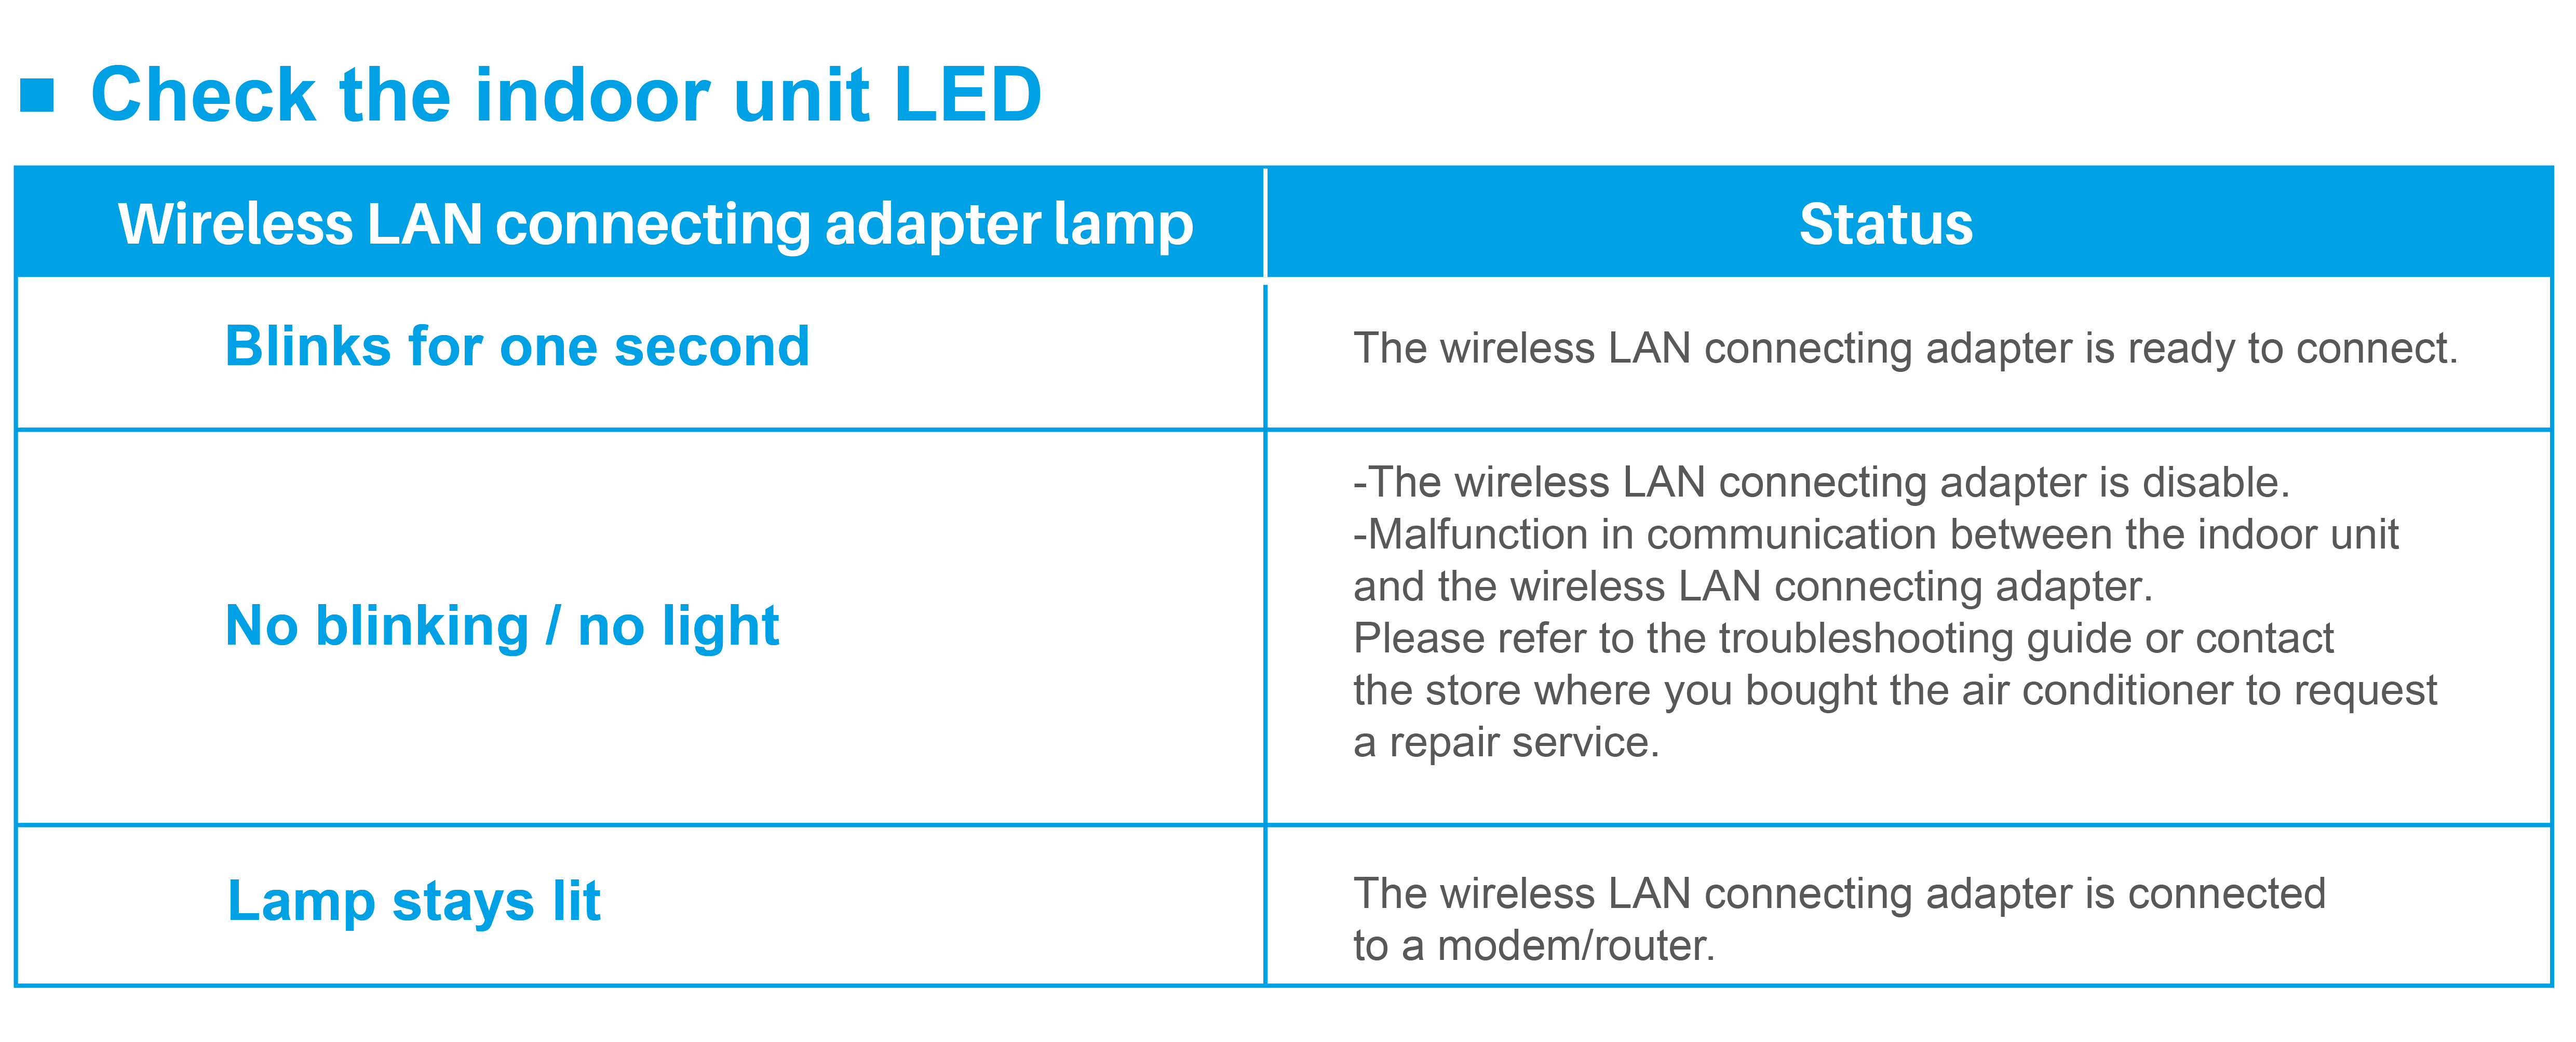
Please check the WLAN adapter LED status in the table below. The direct connection (AP mode) is available when the LED is blinking or lit. Also, please make sure that SSID hiding is turned OFF.
Reset connection setting to factory defaults.
Please note
When the device is reset, (out-of-home user account and wireless LAN connection setting) will be changed back to the factory defaults.
To reset
Before Step 1, ensure that both the unit and the remote are turned off.

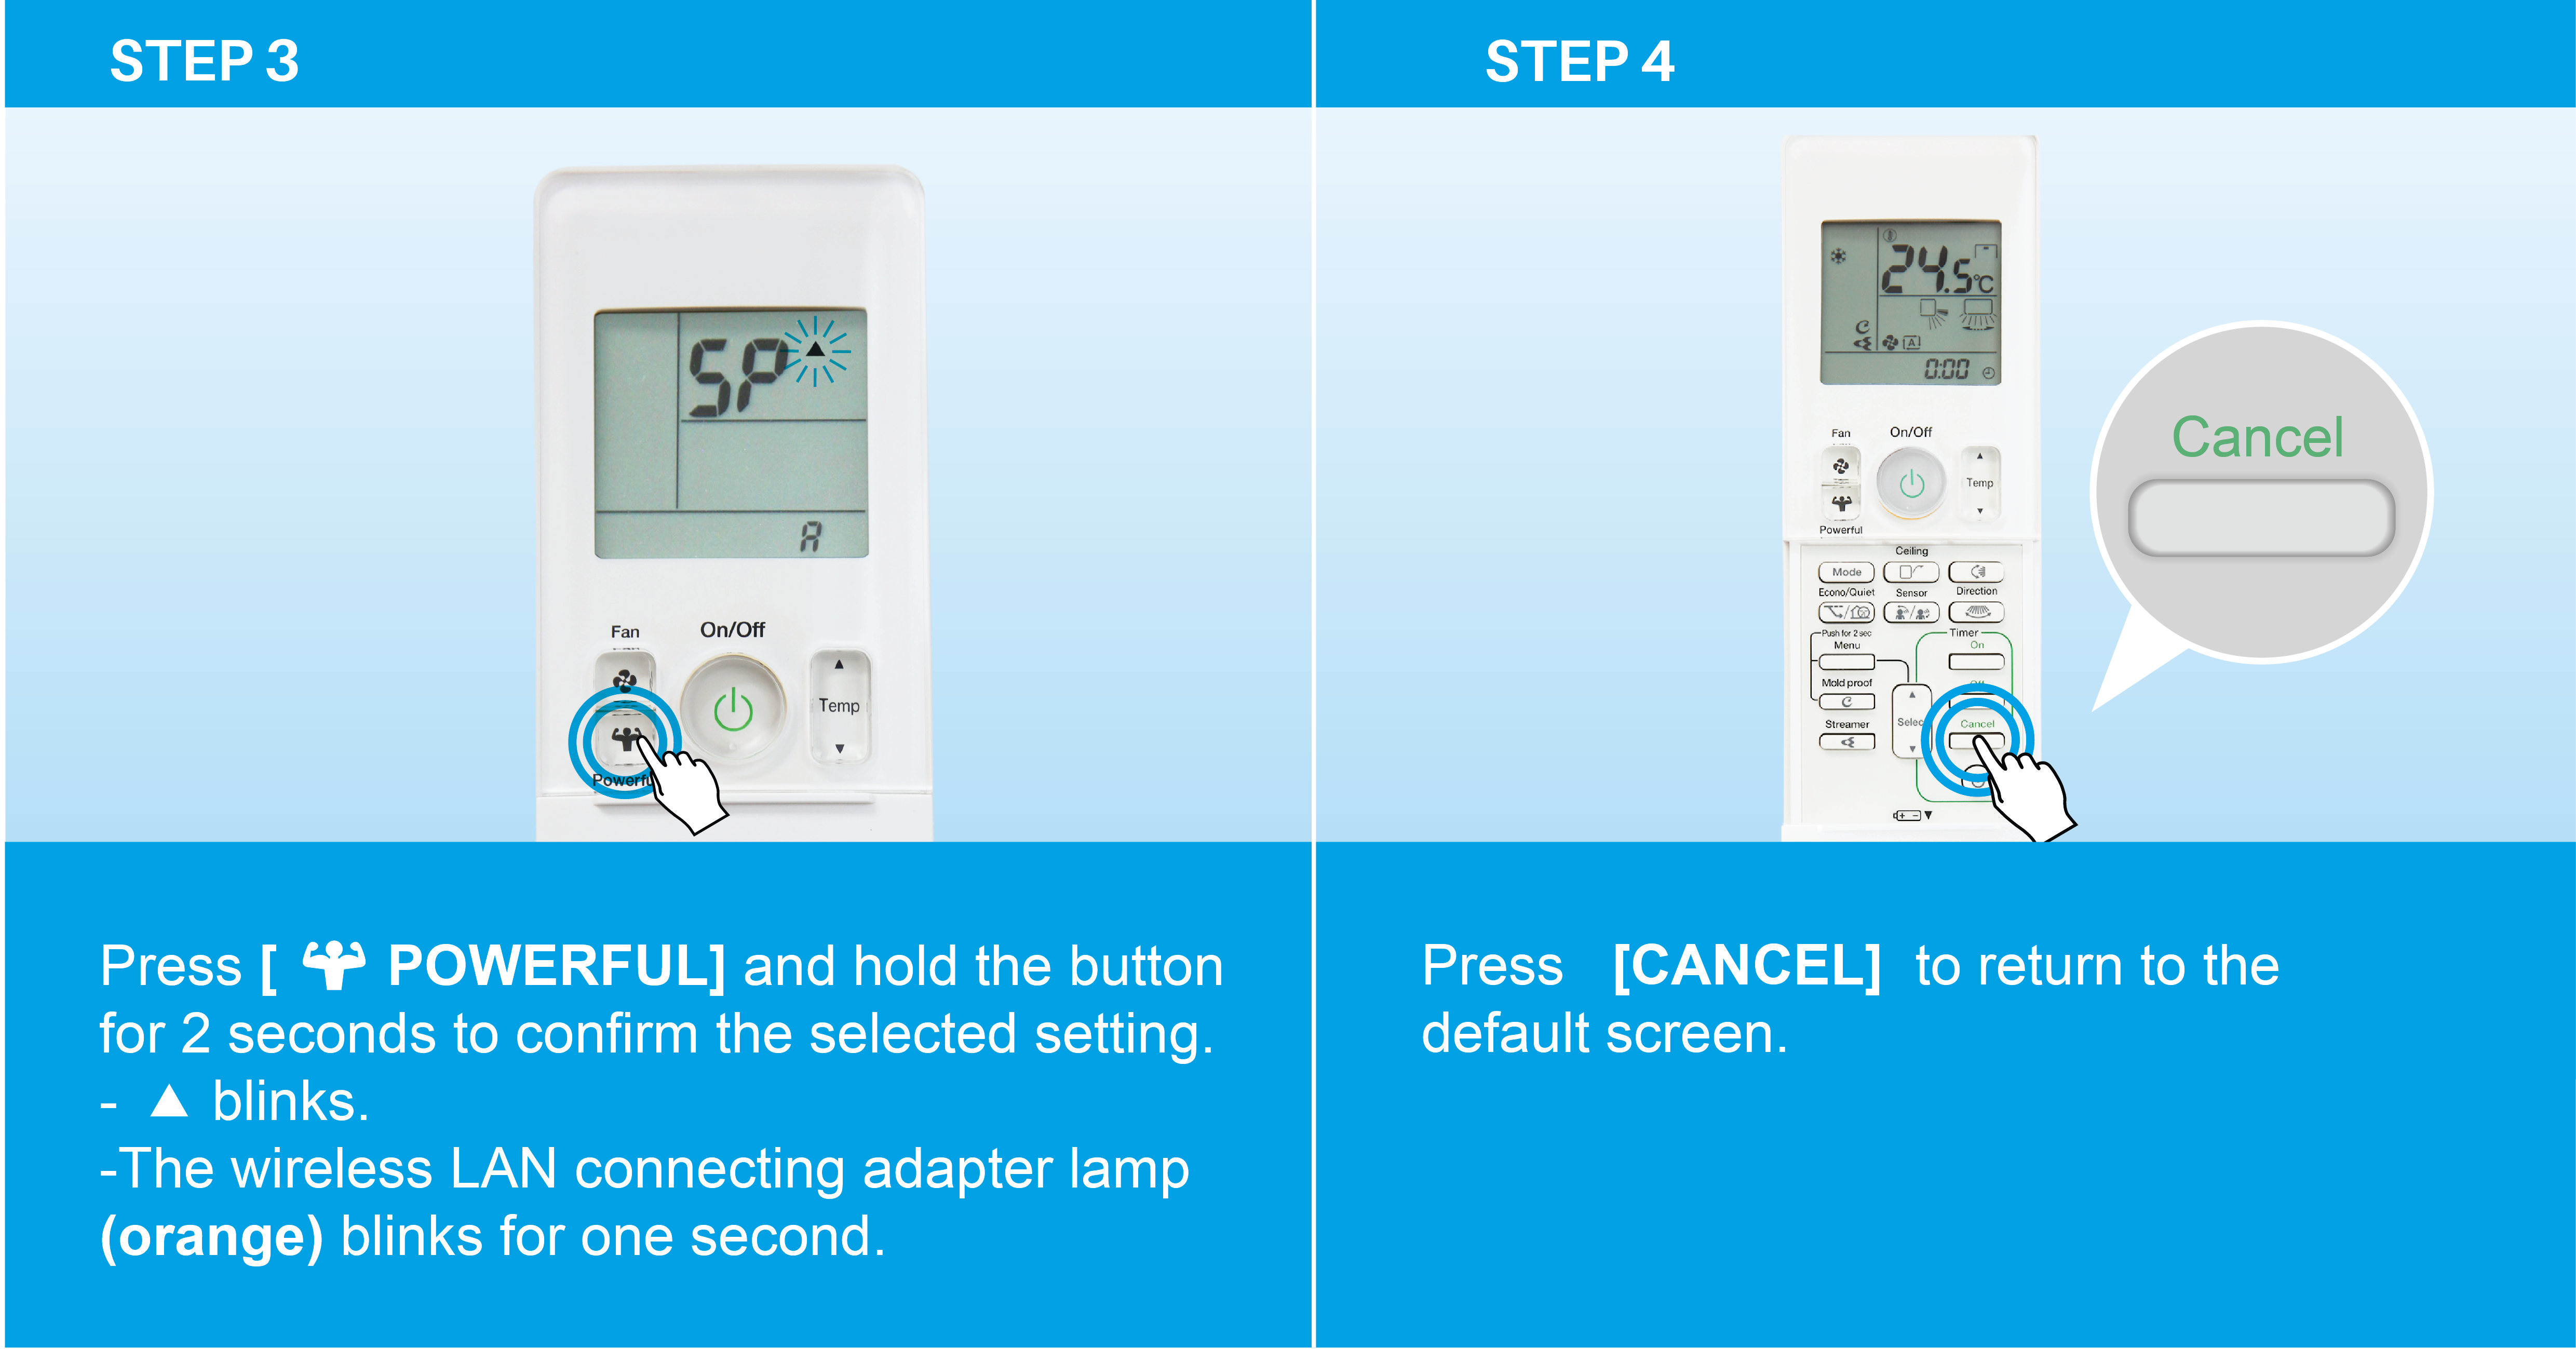
Note: If your remote controller (R/C) differs from the image, please refer to the operation manual for the correct reset method.
The Daikin Mobile Controller application currently supports only English and Traditional Chinese. The application language is automatically set based on your device’s operating system. If your device language is not supported, the application will default to English.
In case the "Wireless connection configuration", it is available only when the smartphone is connected in AP mode. Make sure that the smartphone is connected directly to the WLAN adapter.
For another settings, are available when the smartphone and WLAN adapter are connected in the same wireless network and make sure you are in "In-Home" mode.
WIRELESS LAN CONNECTION (ROUTER DOESN'T HAVE A WPS BUTTON)
If your home Wi-Fi router does not have a WPS button, you can connect your smart phone directly to the Wireless LAN connecting adapter in order to set up a connection to your home network by following these steps.
-This step requires SSID number and KEY located on the indoor unit or on the cover of the manual.
.png)
.png)
NOTE:
If your remote controller (R/C) differs from the image, please refer to the operation manual for the correct reset method.
Note on access point connection (AP connection)
- If you fail to connect (the Wireless LAN connecting adapter lamp (orange) continues to blink), repeat the steps 1-2.
.png)
In case you are connect the WLAN adapter directy (AP mode)
- If you are using an Android smartphone
* Before connecting the DaikinAP*****. Please set the mobile data to be OFF.
* After finish connecting with Smartphone. If there is the pop up like below picture, select "Dismiss".
- If you are using iOS 15 or later
* Please turn off Mobile Data on Settings.
* Problem (iOS): Unable to call HTTP in the local network — all units in the local network show an error. Solution: Restart the device.
In case you are connect the WLAN adapter through router (In-home mode)
Also check that your router supports UDP broadcast function and it’s enabled.
Note: For iOS, in the first tme of using an application, please allow the iOS device to find and connect to other devices in the local network.
In case you are using as Out-of-home operation
There is an error occur with the WLAN adapter or the air conditioner unit.Please confirm the air conditioner manual.
Error details may include:
In case you're using iOS 18 or later:
Please try reopening the app or the unit. If the problem still persists, please restart your smartphone.
You can see the In-Home/Out-of-Home status on the top bar of the application.
Make sure you are logged in and then go to app menu on the left side,
you can switch mode using "Switch to In-Home" or "Switch to Out-of-home" menu.
Make sure you are logged in before do the next step.
You can change the password from the following steps:
1. From the app menu bar on the left side.
2. Tap "General settings" -> "Change password".
3. Follow the instruction on the screen.
Since the application not support the forget password function.
You can only create a new account and password from the "Login" page.
Make sure you are logged in to the application.
You can delete the current account from the following steps:
[WARNING!] After the account is deleted, all of units will be unlinked from your account, if you to operate the units from outside, please create new account and re-enable Out-of-home for each units.
1. From the app menu bar on the left side.
2. Tap ""General settings"" -> "Delete account".
3. Follow the instruction on the screen.
Normally the Out-of-home status of the unit will be change to OFF within 2 minutes after account deletion finished.
However, you can turn it OFF by yourself.
- If your application is the latest version, you have to turn ON the Out-of-Home on the unit by yourself.
Note: This process have to be done in the local network (smartphone and the unit must be in the same wireless network)
- If your application is not the latest version, please update it.
If your account is linked to voice controller service (ex. Google home or Alexa), the re-authenthication process is needed after the device firmware update is completed.
REMARK: Perform this instruction only one time per account.
For Alexa user, please follow this instructions:
[ALEXA]
**********************************************************
Open Alexa app and try DISABLE the "DAIKIN Mobile Controller" skill using Alexa app and then ENABLE it again or you can follow below instructions:
How to DISABLE the skill.
1. Open Alexa app and go to "More" menu.
2. Tap on "Skills & Games".
3. Search for "DAIKIN Mobile Controller" and tap on it.
4. Select "DISABLE SKILL" and confirm the disablling.
How to ENABLE the skill.
1. Open Alexa app and go to "More" menu.
2. Tap on "Skills & Games".
3. Search for "DAIKIN Mobile Controller" and tap on it.
4. Select "ENABLE TO USE" and follow the instruction on the screen until finish.
**********************************************************
For Google Home user, please follow this instructions:
[Google Home]
Open Google Home app and try Reconnect account of the "DAIKIN Mobile Controller" service or you can follow below instructions:
How to reconnect account.
1. Open Google Home app and go to "Settings".
2. Seek for "Services" topic then tap on "Works with Google".
3. Below the "Linked services", tap on "DAIKIN Mobile Controller" and select "Reconnect account".
4. Select "Continue" and follow the instruction on the screen.
Please check the following conditions:
1.Make sure that the WLAN adapter is power ON.
2.Make sure that the WLAN adapter is connected to the router (basically WLAN adapter's LED should light or display as green)
3.Make sure that your router can access the internet.
4.Make sure that your application is the latest version.
5.Make sure that the WLAN adapter's Out-of-Home status is set to ON.
6.If the problem still persist, please contact your Daikin local service.
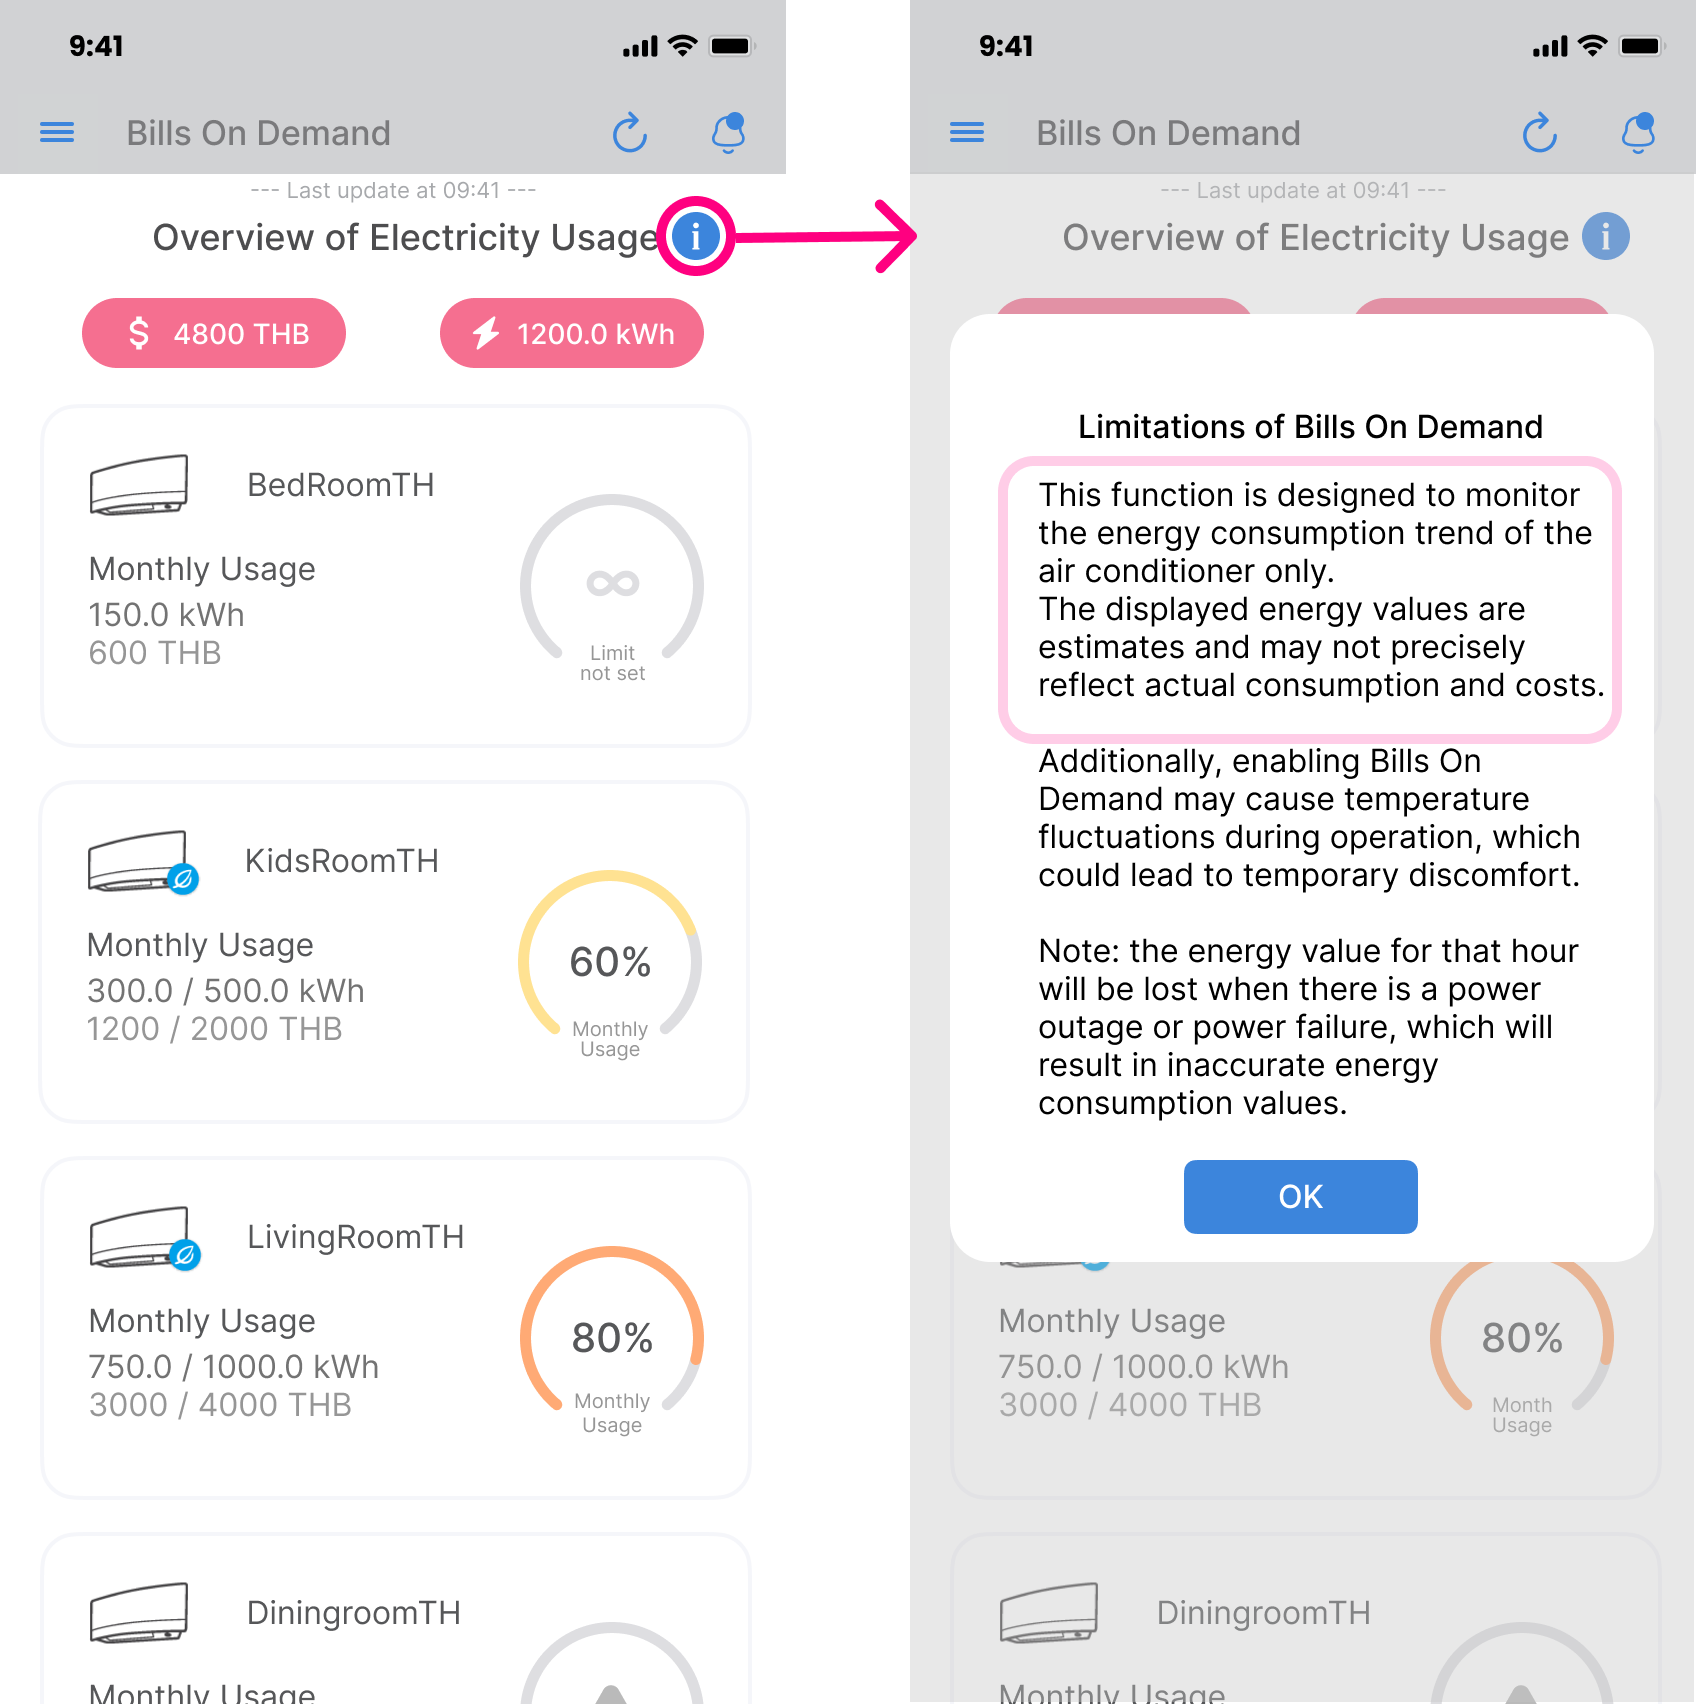
Bills On Demand is a feature that helps monitor energy usage, estimate and limit the real-time electricity costs based on your target.
No, this function requires an internet connection.
Pre-requisitions:
1. This function required the internet connection.
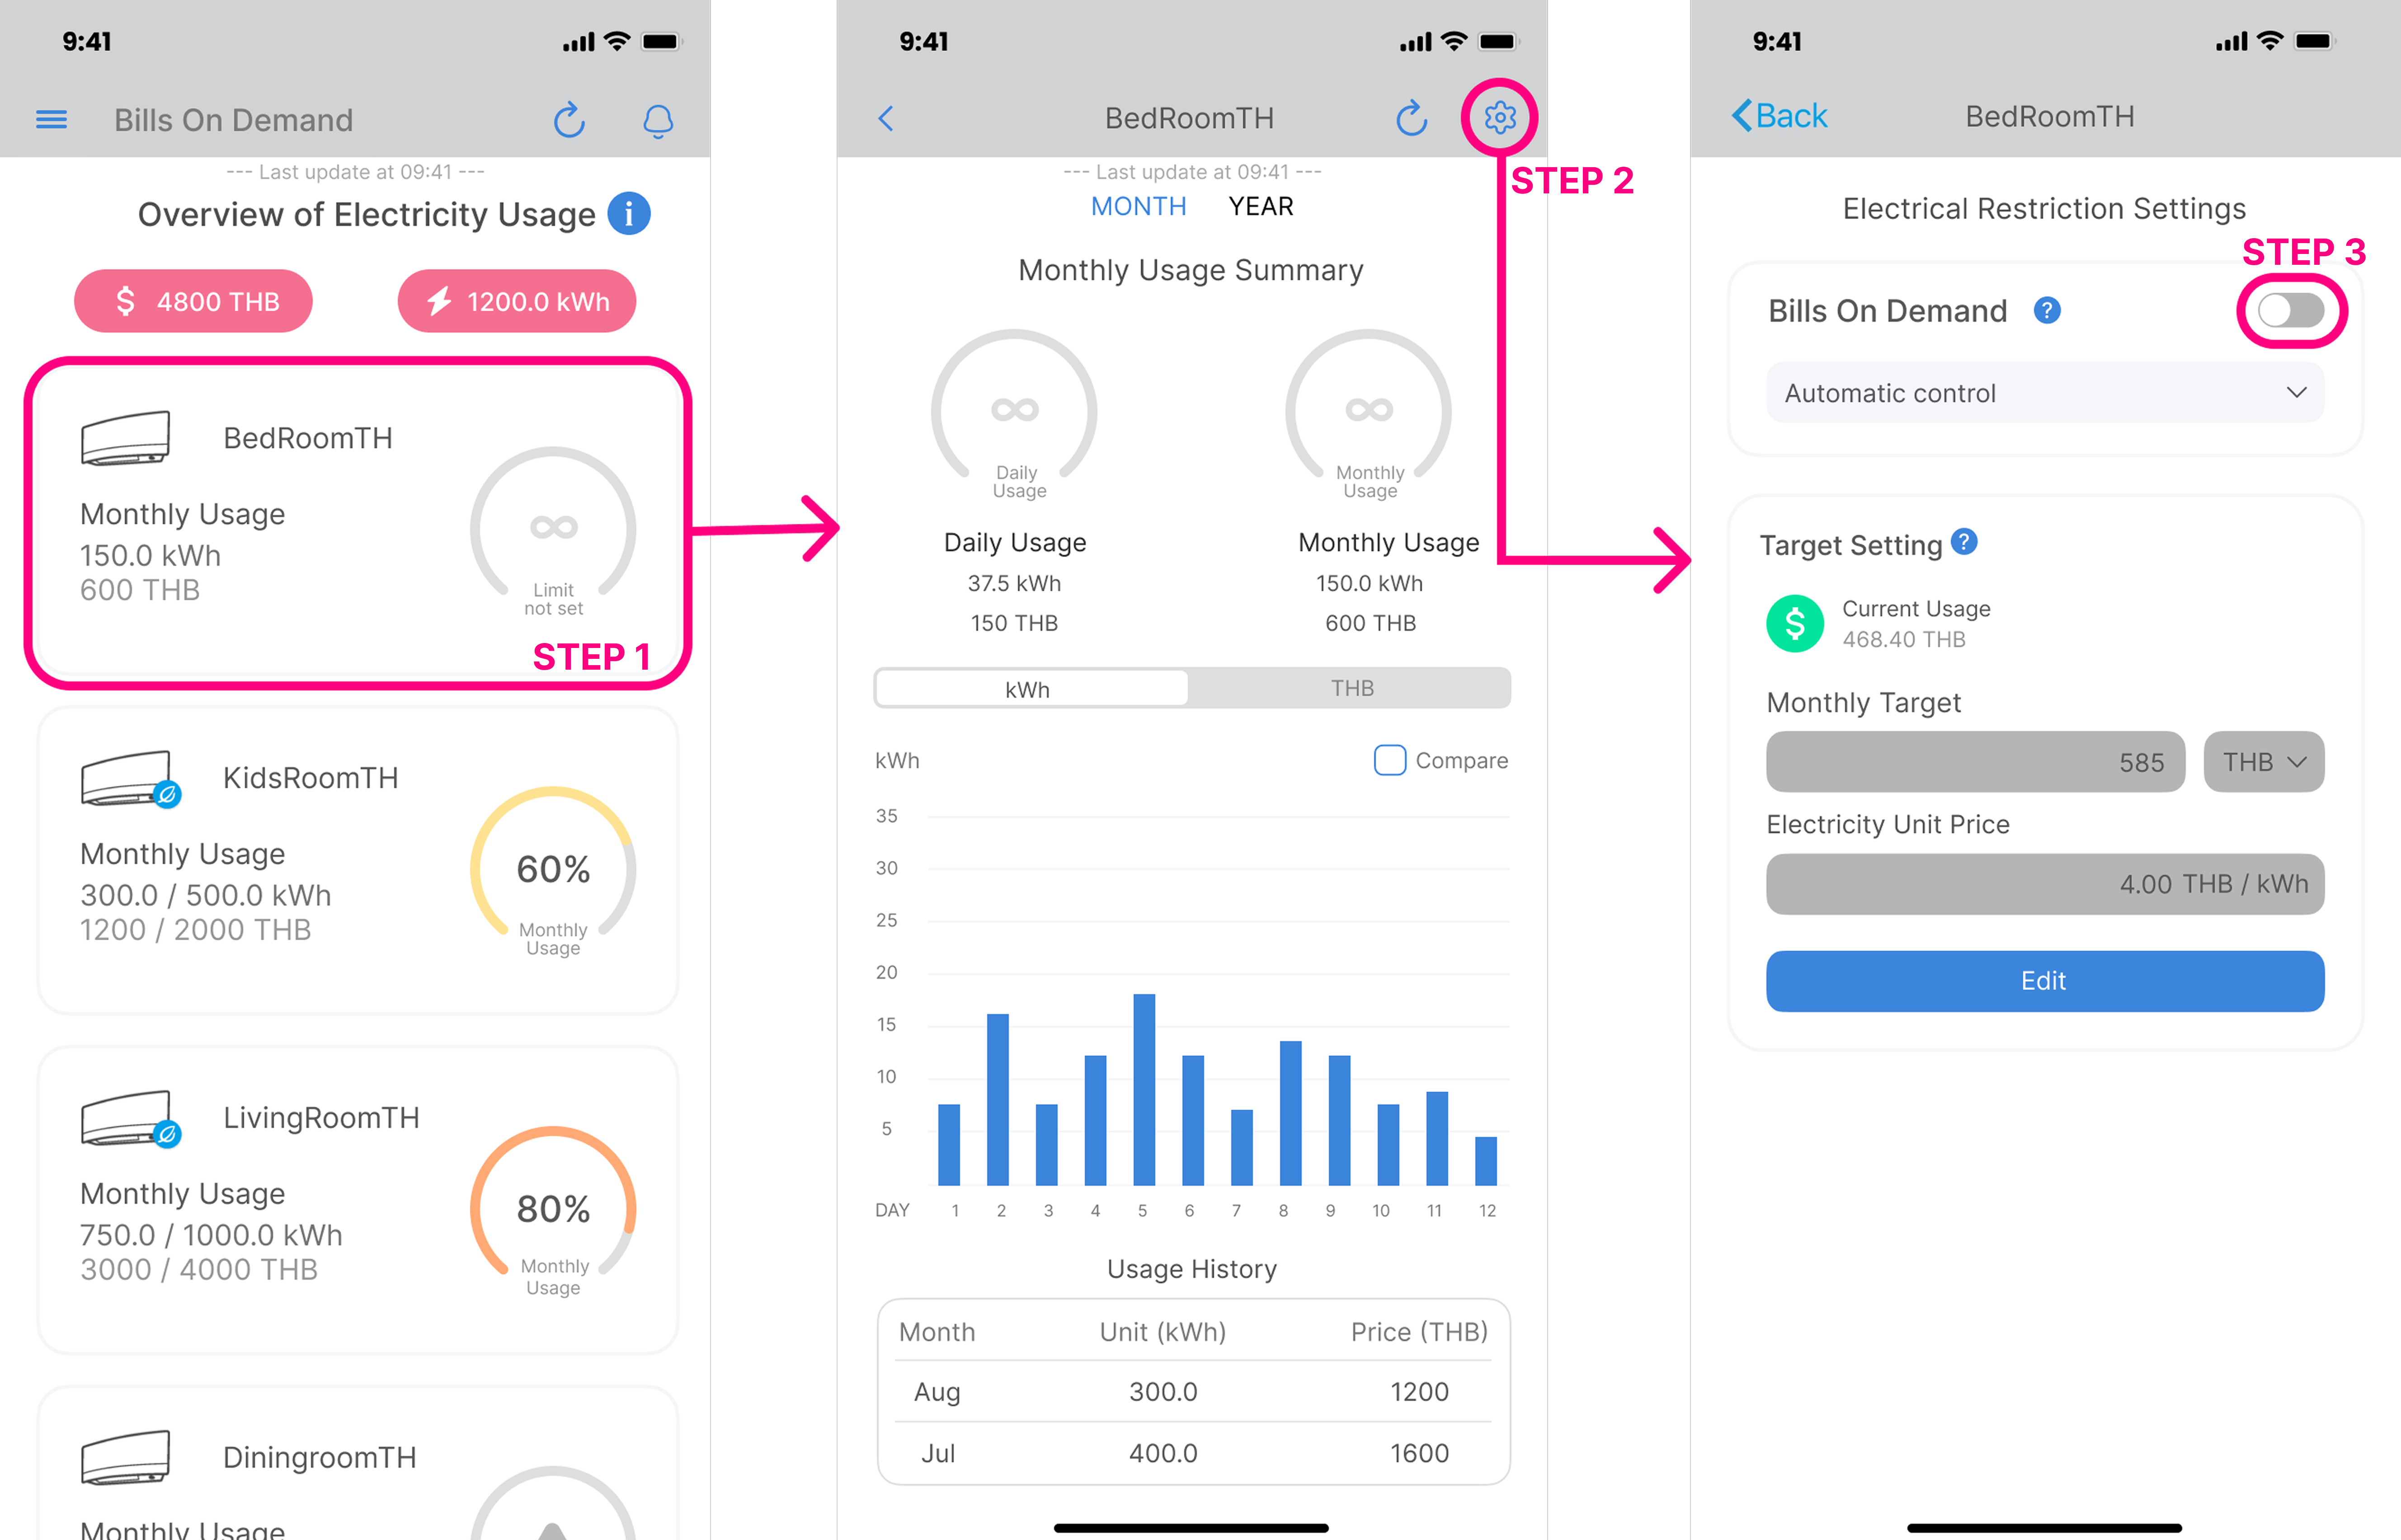
Steps to limit electricity cost on Bills On Demand Function:
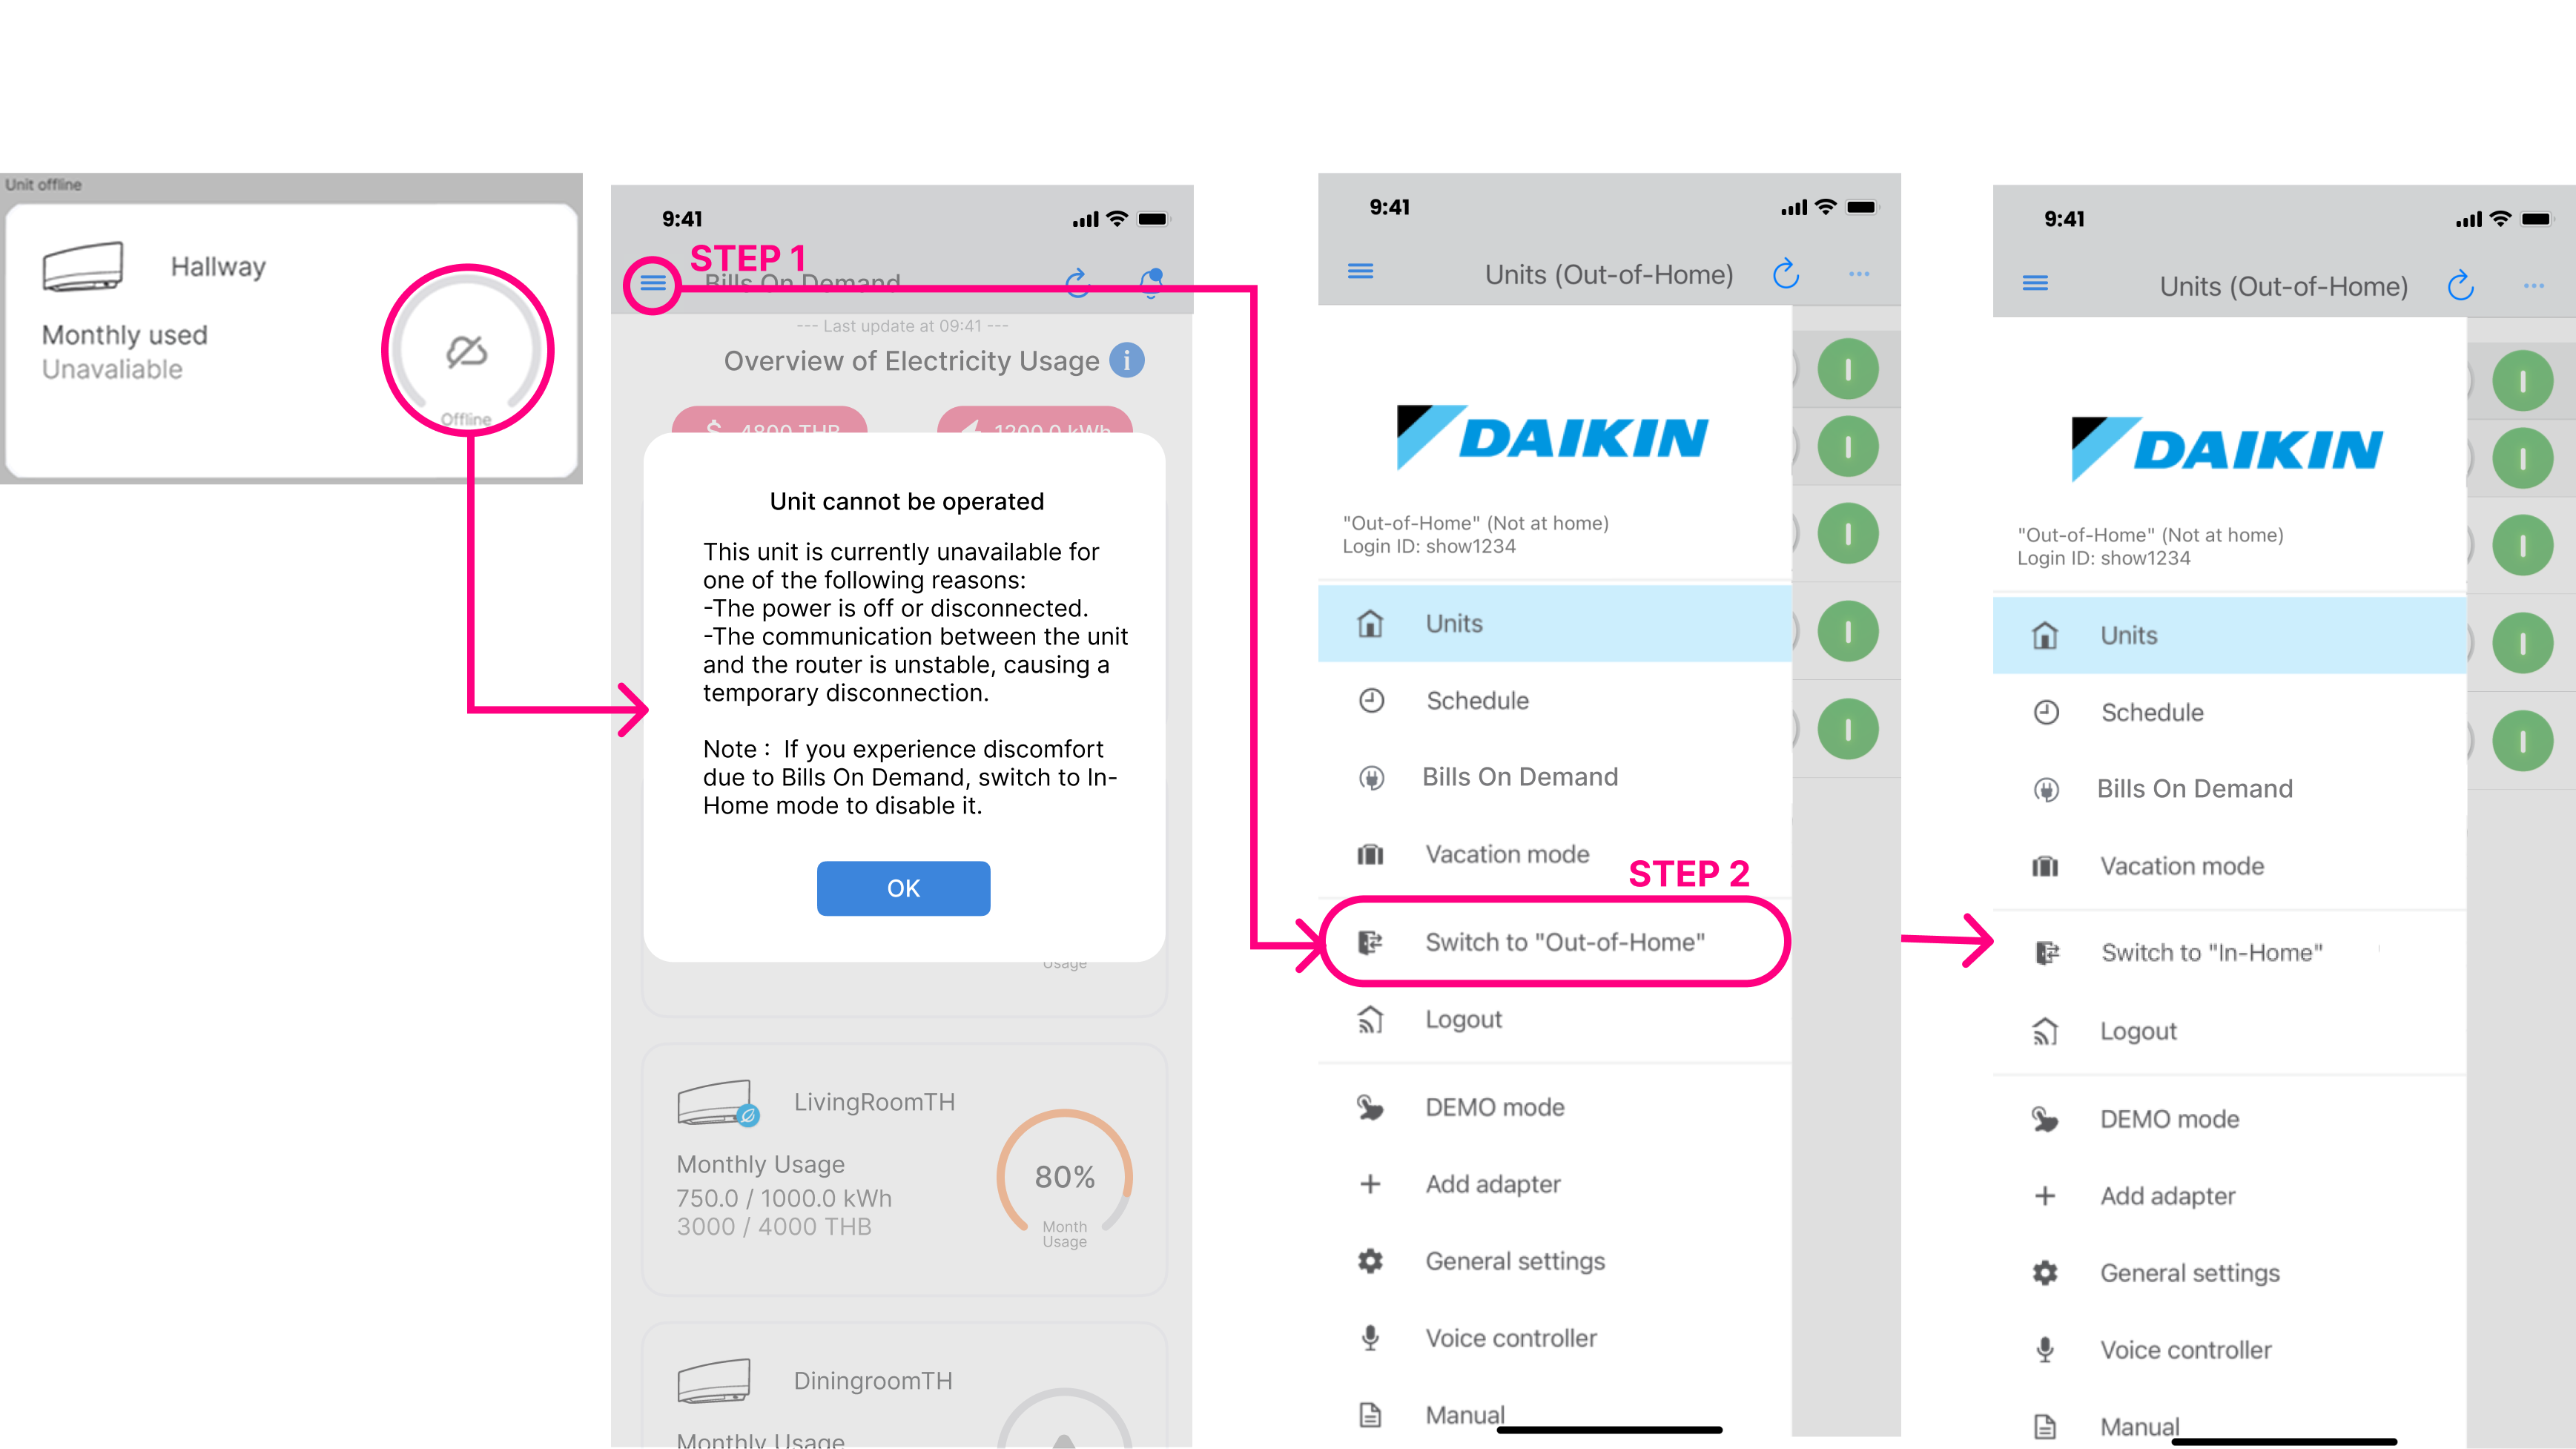
1. The device must be set to Out-of-Home mode each time to use the Bills On Demand function.
2. Click on the Menu ➩ Bills On Demand to view the compatible devices.
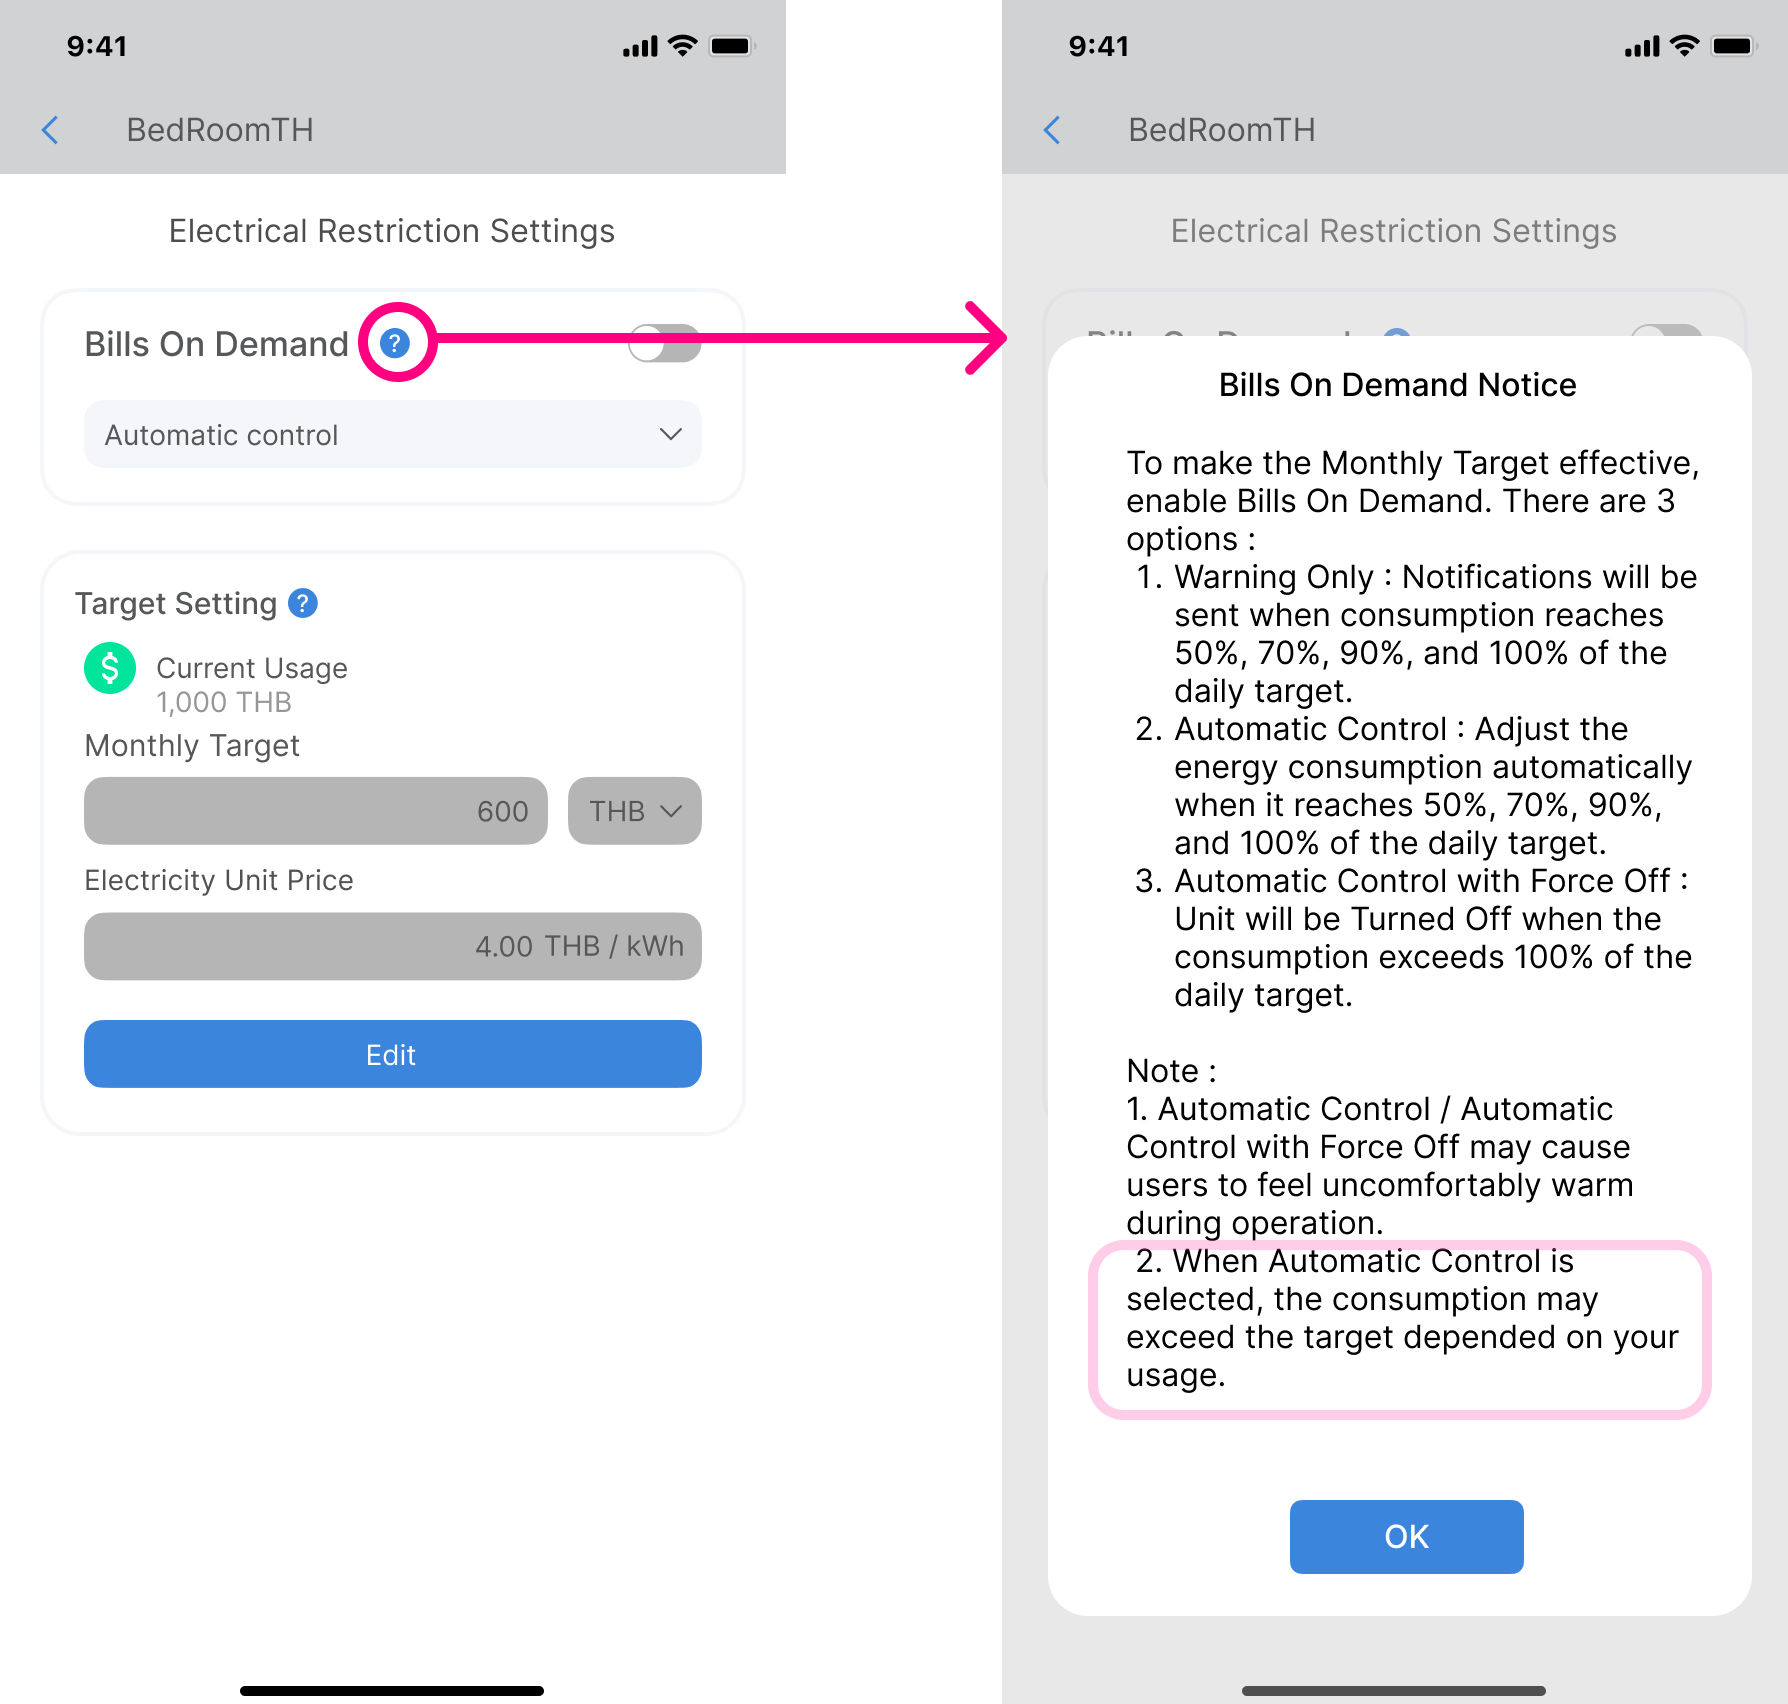
3. Click on the desired device ➩ Settings .
4. Select the desired Bills On Demand option.
5. Click Edit ➩ Input the desired Monthly Target (Note: The Monthly Target must be greater than the current usage.)
6. It is recommended to input the Unit Price according to your electricity meter rate.
7. Click Apply to save settings, then enable Bills On Demand.
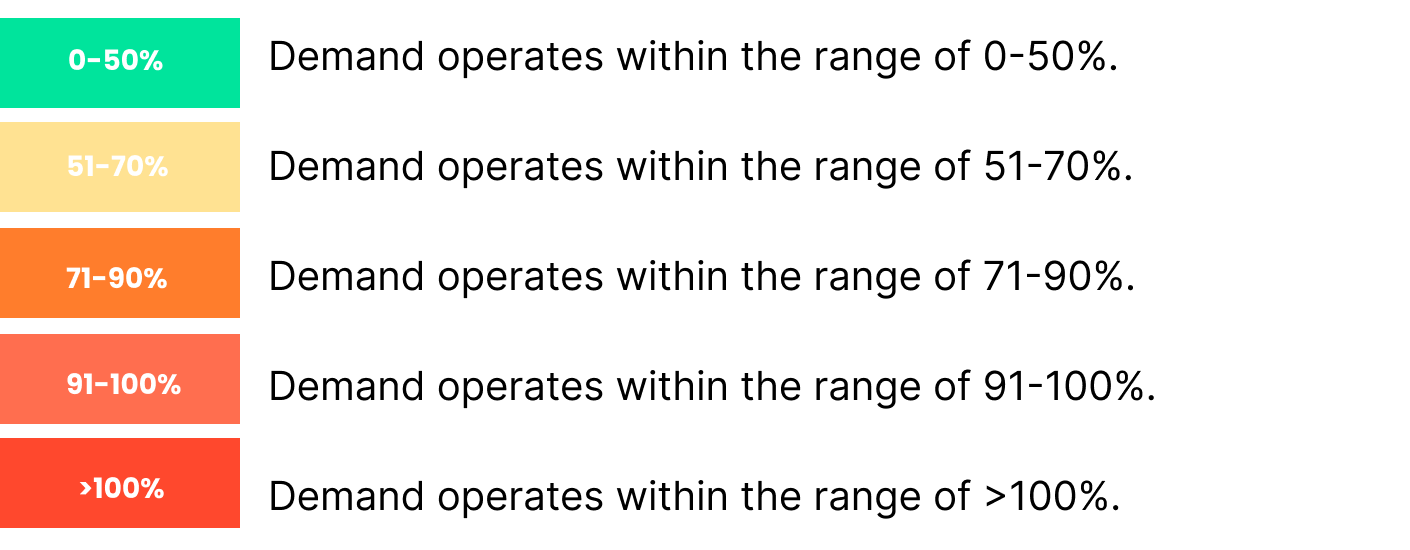
Each color in the Pie Chart indicates the current energy consumption status in relation to the Monthly Target:
Yes, you can use with limited feature.
The Monthly Usage Summary cannot be generated in In-Home mode.
You can only view the kWh data for the current month and the previous month.
.png)
Yes, you can but you need to disable the Bills On Demand first before editing the target.
1. Warning Only : Notifications will be sent when consumption reaches 50%, 70%, 90%, and 100% of the daily target.
2. Automatic Control : Adjust the energy consumption automatically when it reaches 50%, 70%, 90%, and 100% of the daily target.
3. Automatic Control with force off : Unit will be Turned Off when the consumption exceeds 100% of the daily target.
Note :
1.Automatic Control / Automatic Control with force off may cause users to feel uncomfortably warm during operation.
2.When Automatic Control is selected, the consumption may exceed the target depended on your usage.
Yes, you can adjust the temperature while Bills On Demand is enabled. However, this may cause slight temperature fluctuations, which could result in temporary discomfort, such as feeling uncomfortably warm.
Data is updated in near real-time, depending on network connection and device status.
Please make sure that notifications are enabled in both the app settings and the device settings.
"Limit Not Set" indicates Bills On Demand is disabled. To enable, Select the unit on the Bills On Demand page, go to Settings, and turn on Bills On Demand.
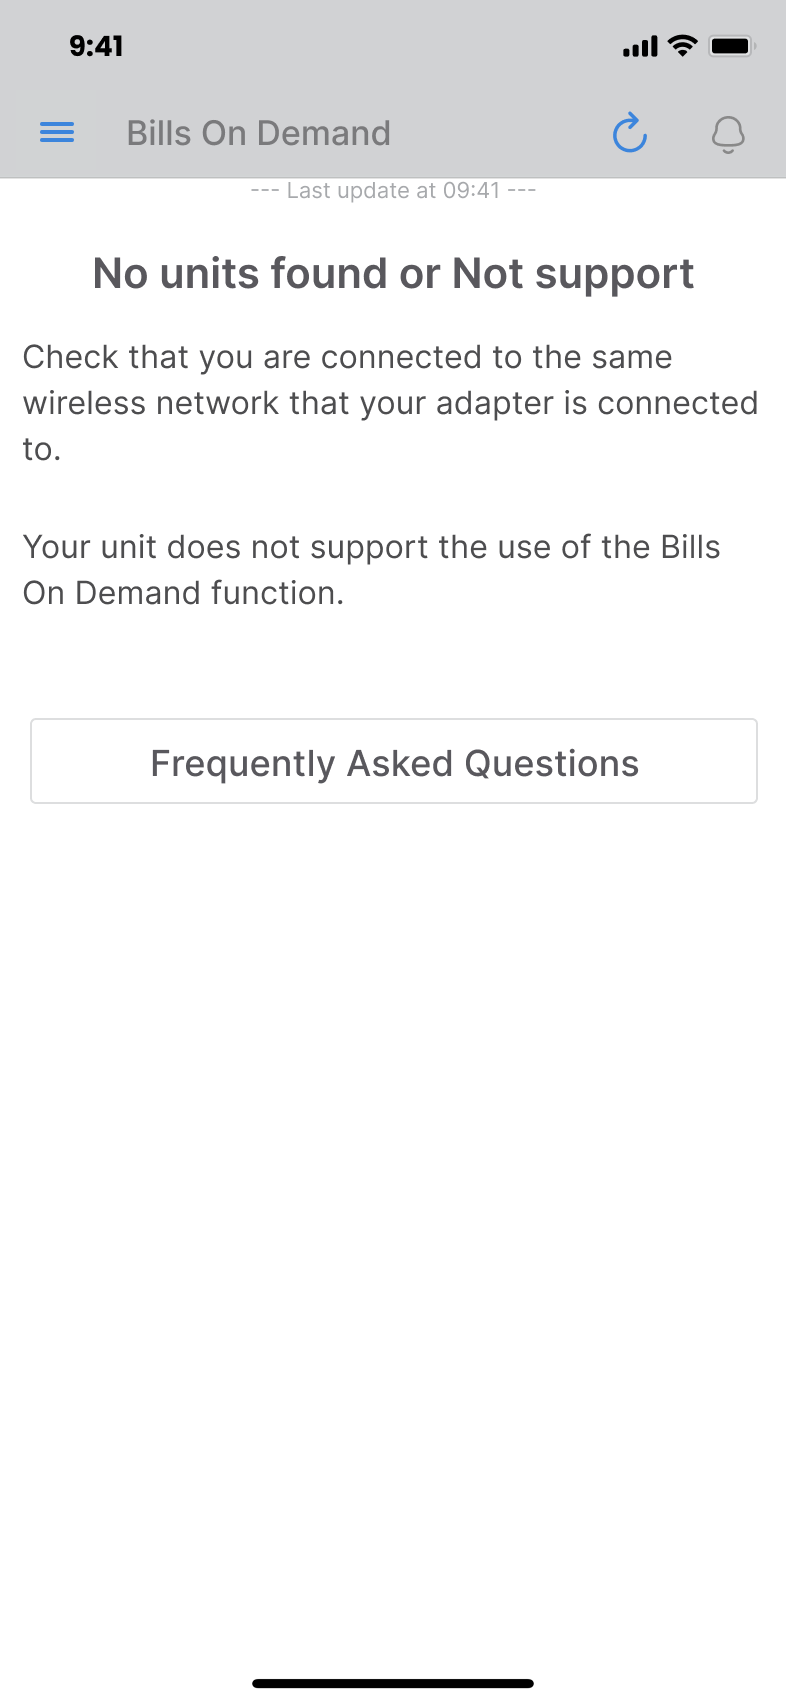
This message appears when the system cannot detect a compatible unit or the connected unit is not supported, indicating that the user's unit cannot use the Bills On Demand function.
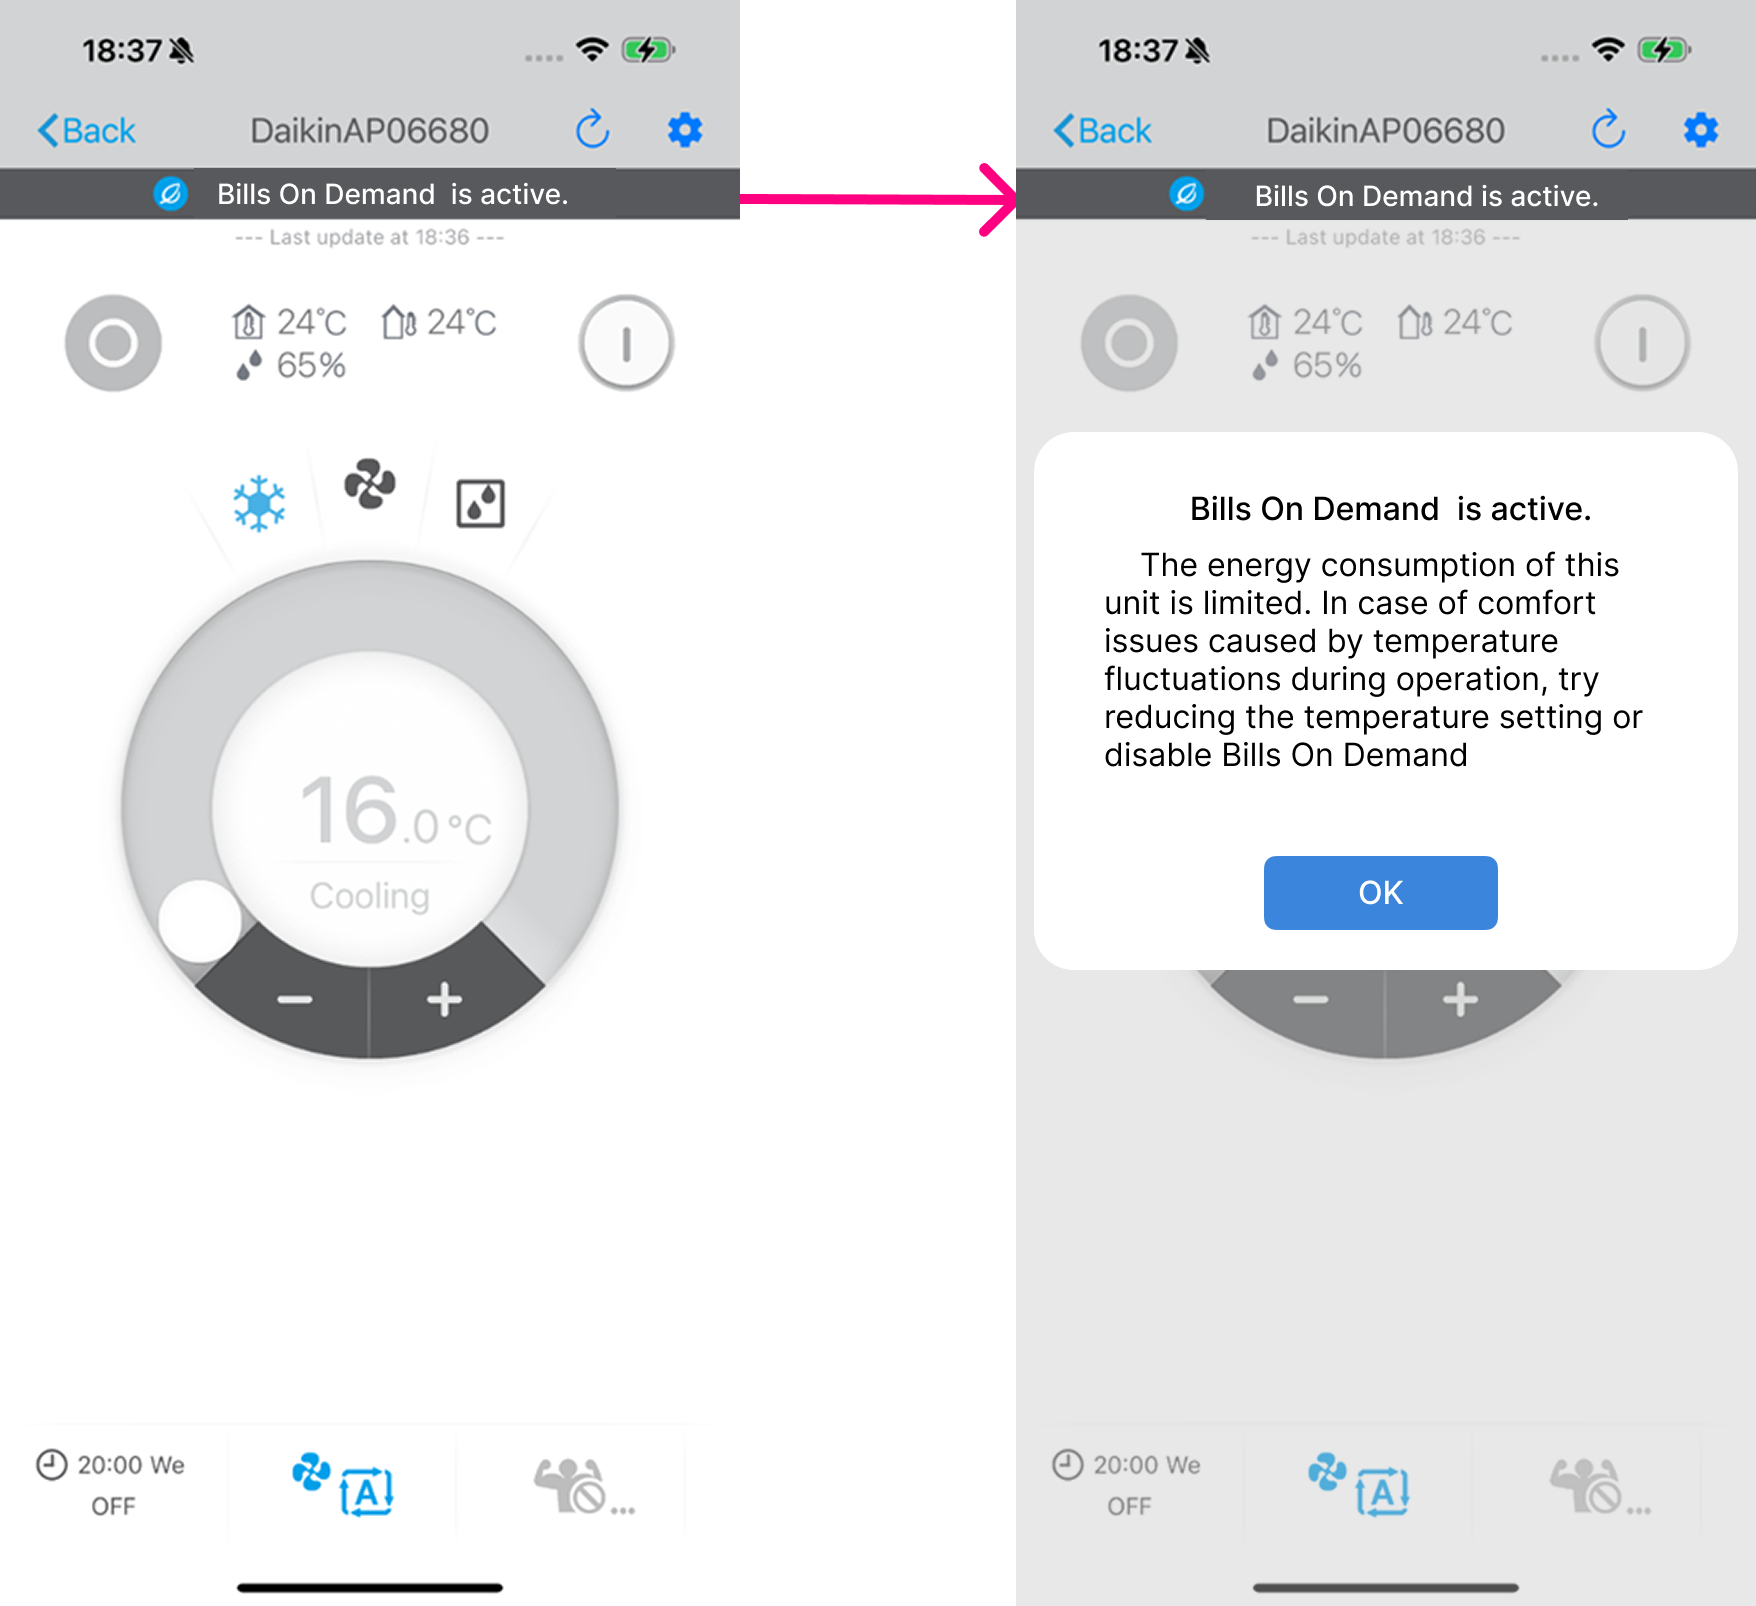
 Eco icon / Bills On Demand banner show when demand control is active.
Indicates that the energy consumption of this unit is limited. Users may feel uncomfortable. In case of comfort issues caused by temperature fluctuations during operation, try reducing the temperature setting or disabling Bills On Demand.
Once the air conditioner loses of power or power outage, the energy values of that hour will be lost, leading to inaccurate energy consumption values.
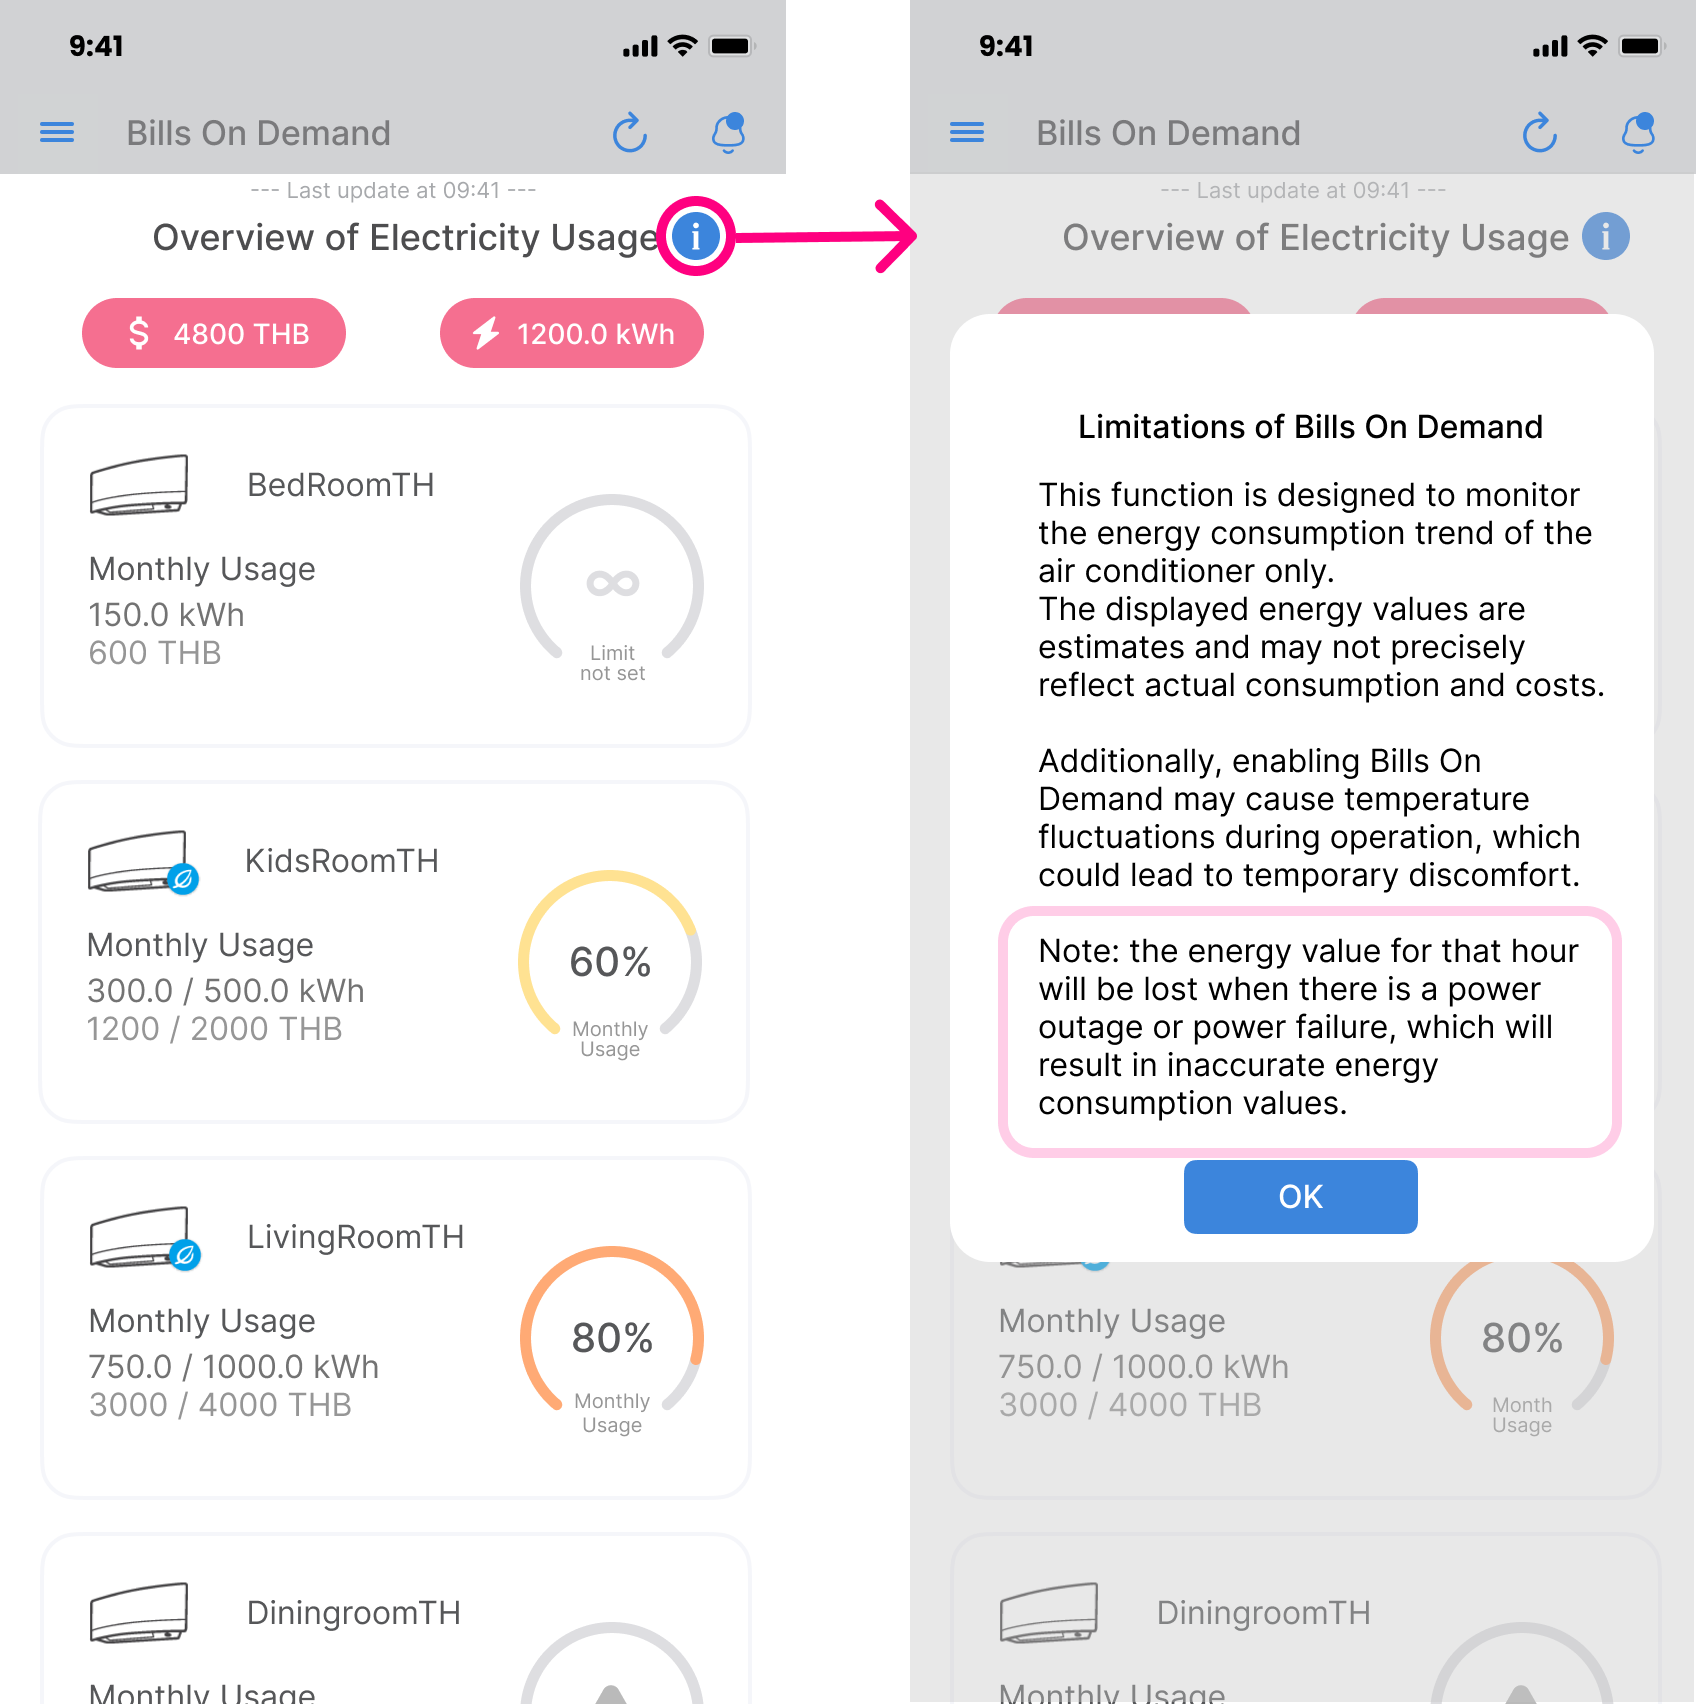
This function is designed only to monitor the energy consumption trend of the air conditioner. Displayed energy values are estimates and may not precisely reflect actual consumption and costs.
This can occur because, when Automatic Control is selected, the consumption may exceed the target depending on your usage.
If you experience discomfort due to Bills on Demand, you can switch to In-Home mode to disable it.